Rules integrations and widgets
- Skip Ahead to
- Overview
- How to create a rule
- Gmail
- PagerDuty
- Twilio
- Google Calendar
- Dropbox
- Box
- Microsoft OneDrive
- HubSpot
- Notion
- Mailchimp
- Freshdesk
- Intercom
- Bynder
- DocuSign
- Confluence
Overview
Rules are an important part of many workflows, and so are integrations. Now, you can use a rule to integrate your team's favorite tools into your work in Asana, and let rules do the heavy lifting automatically. You can set specific triggers in your Asana projects, and trust rules to automate your workflow when your chosen criteria are met.
For example, the Slack + Asana rule integration allows you to send a message to a teammate or channel in Slack based on your chosen trigger, like task completion.
Rules are available with Asana Premium, Business, and Enterprise, as are rule integrations.
How to create a rule
Below is an example of how to create a rule in your Asana project by selecting a trigger, an action, and a rule name.

To learn more about rules and how to use them to automate your daily work, head to our rules article on the Asana Help Center.
Gmail
Leverage rules to send an email from your Gmail account to your chosen recipient when certain parameters are met—all decided by you in advance. Choose from many triggers such as when a task is no longer blocked or a due date is approaching, and let rules automatically send an email with a custom message.
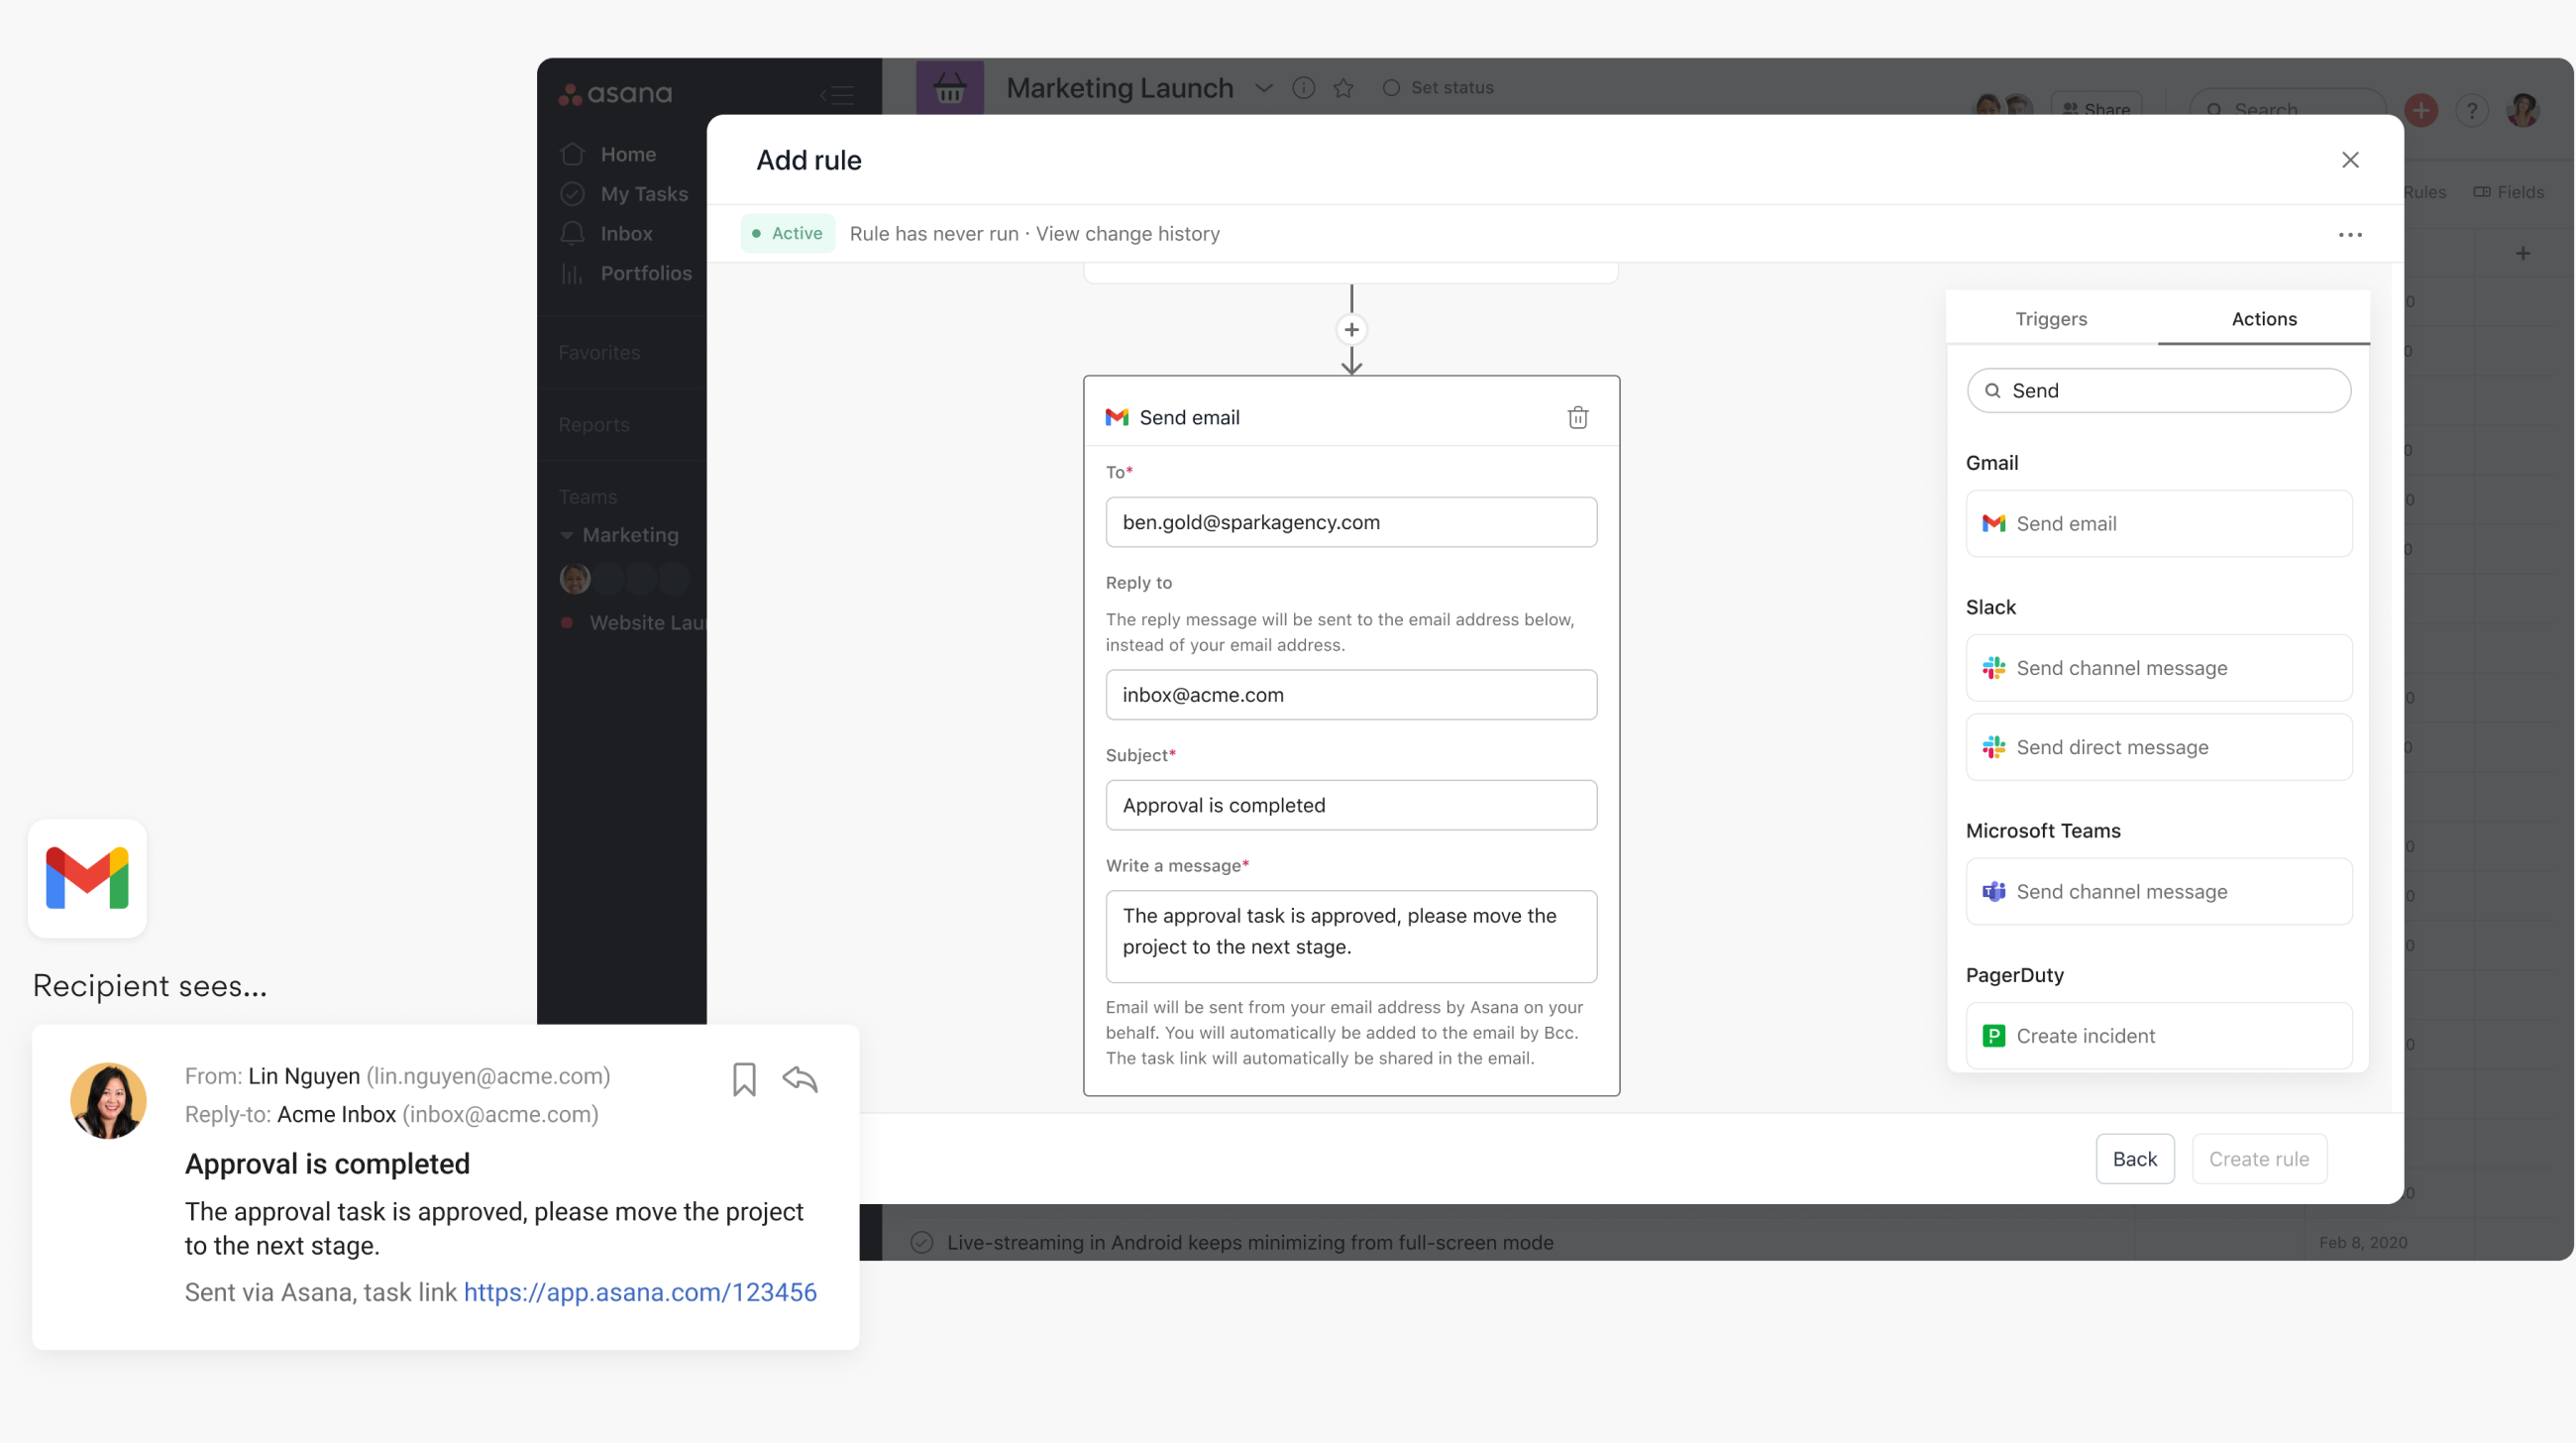
Steps to configure rules integration
- In your project, click Customize in the top-right corner and select Add rule from the list
- From Add rule, select a trigger such as Approval complete.
- From the Actions tab, select Send email.
- Enter the recipient’s email address in the To field
- Enter a Reply to email address
- Enter the email's subject line in the Subject field
- Write the body of the email in the Write a message field
In this example, when the task is approved the rule is triggered and the action is taken; an email will be sent from your email address and will automatically Bcc you on the email. The task link will also be included in the email.
Twilio
To communicate seamlessly with your clients or collaborators, rely on rules to send an SMS text via Twilio, based on triggers and combinations that you can set in advance.
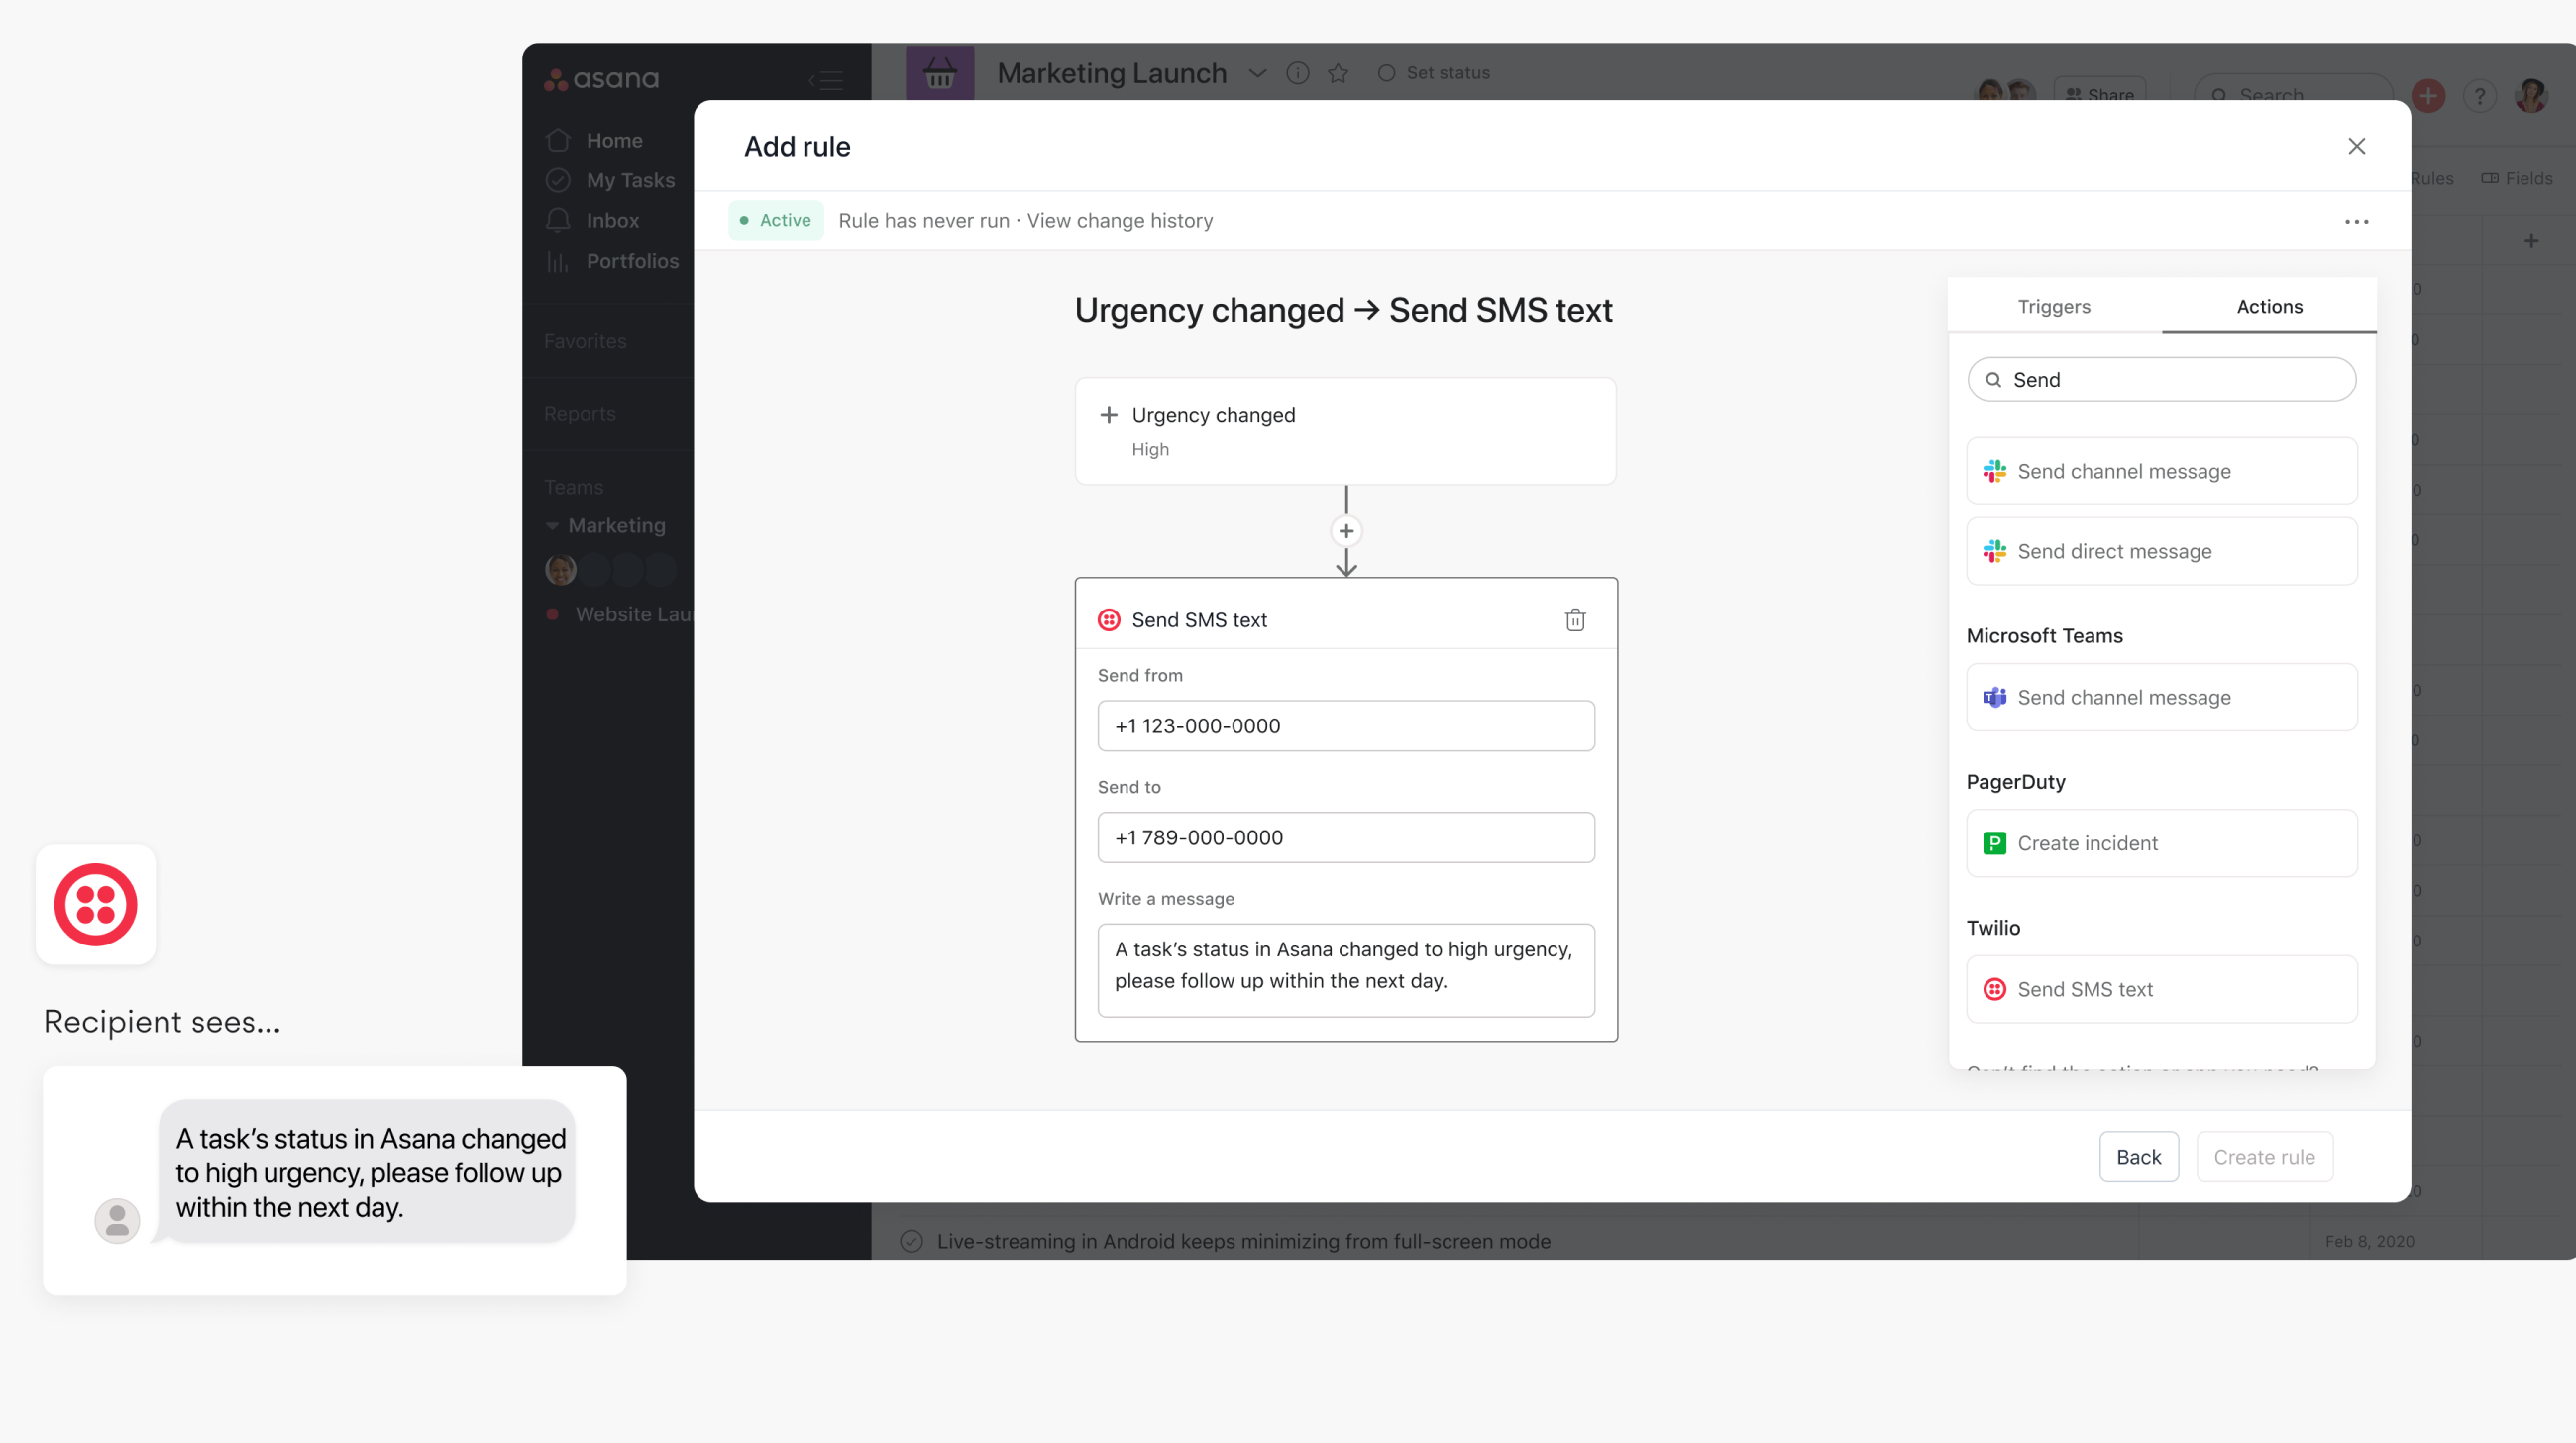
Steps to configure rules integration
- In your project, click Customize in the top-right corner and select Add rule from the list
- From Add rule, select a trigger such as the custom field value Urgency being changed to High
- From the Actions tab, select Send SMS text
- Select Connect to Twilio. You’ll be asked to provide your Twilio Account SID and Auth Token. You can find this by logging into your Twilio account and selecting Account and your token will be under Auth tokens.
- After connecting your account, enter your Twilio phone number
- Enter the recipient’s phone number in the Send to field
- Write the content of the message in the Write a message field
In this example, when the custom field value Urgency is set to High, the rule is triggered and the action is taken; an SMS message is sent to the chosen recipient.
PagerDuty
Trust rules to notify your incident response team via PagerDuty when a task needs attention. Your chosen triggers allow Asana to integrate with PagerDuty and create incidents with context from the task automatically, whatever time of day or night.
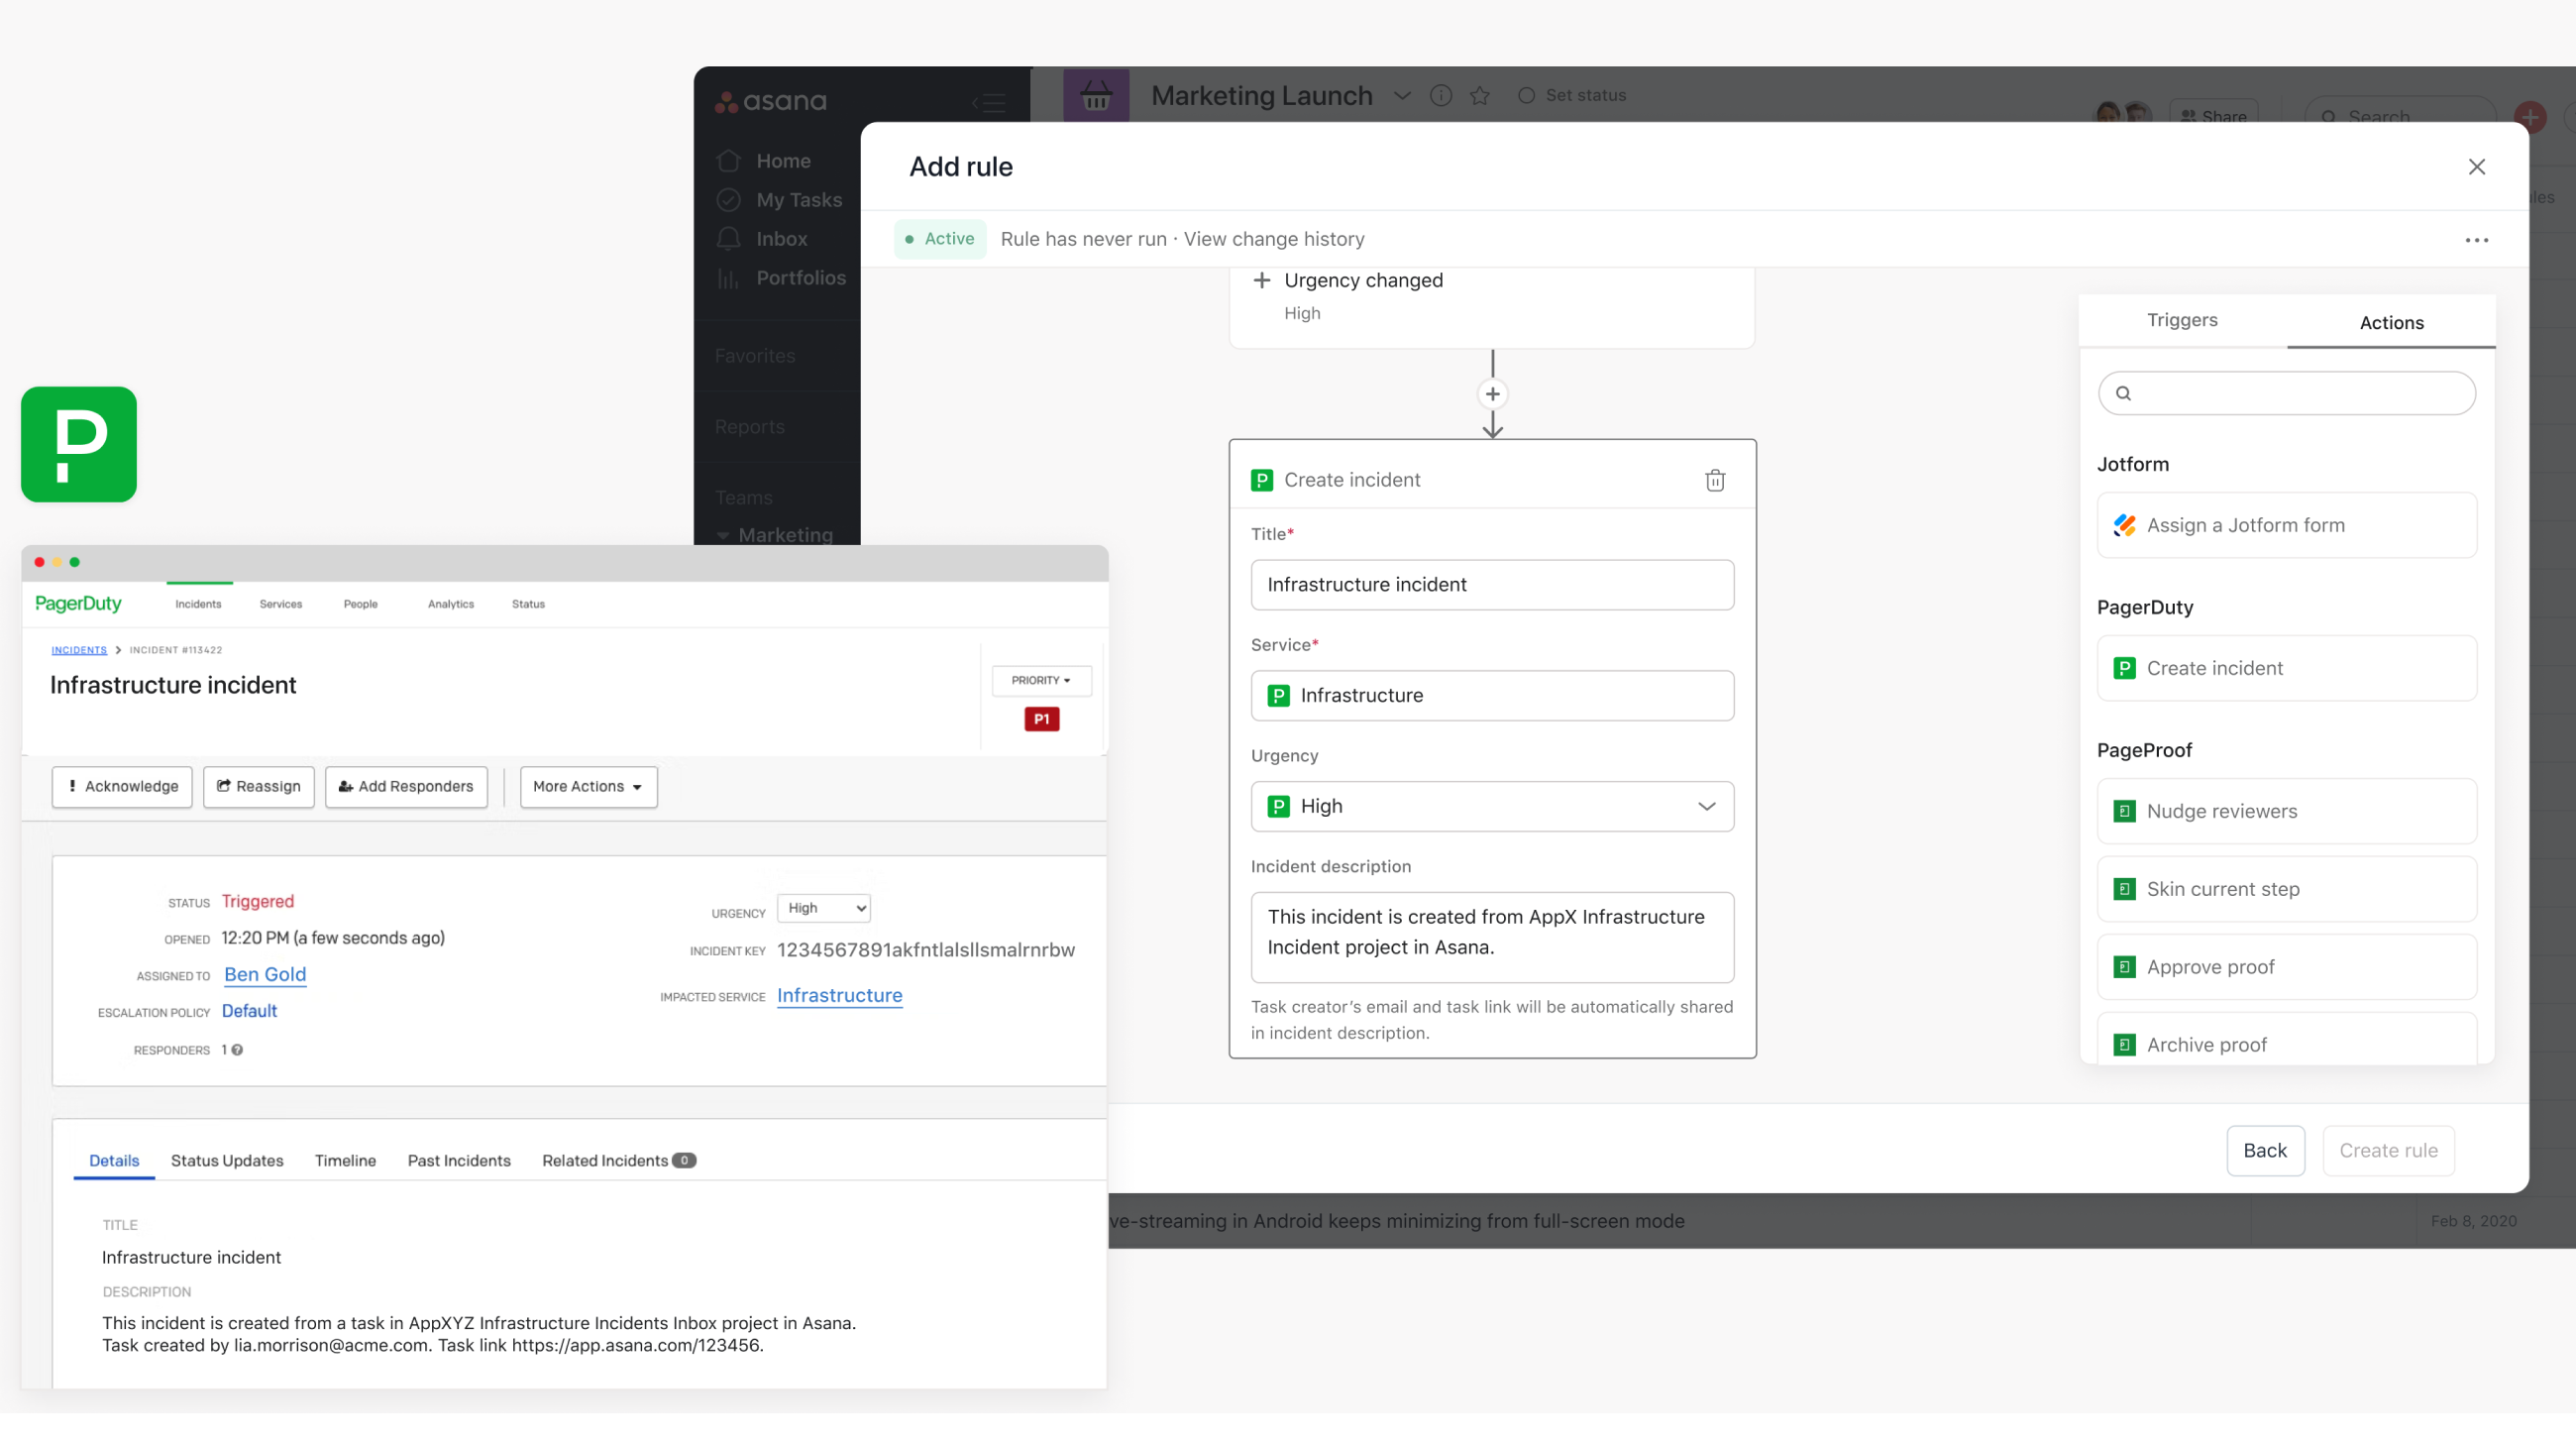
Steps to configure rules integration
- In your project, click Customize in the top right corner and select Add rule from the list
- From Add rule, select a trigger such as the custom field value Urgency being changed to High
- From the Actions tab, select Create incident
- Enter a title for the incident in the Title field
- Choose a service from the Service field
- Select the urgency from the Urgency field
- Enter an Incedent description.
In this example, when the custom field value Urgency is set to High, the rule is triggered and the action is taken; a Pagerduty incident is created. The task creator’s email and task link will be automatically shared in the incident description.
Google Calendar
With rules, teams can go from manually scheduling meetings to automatically creating a Google Calendar meeting with project collaborators when an Asana task reaches a certain stage.
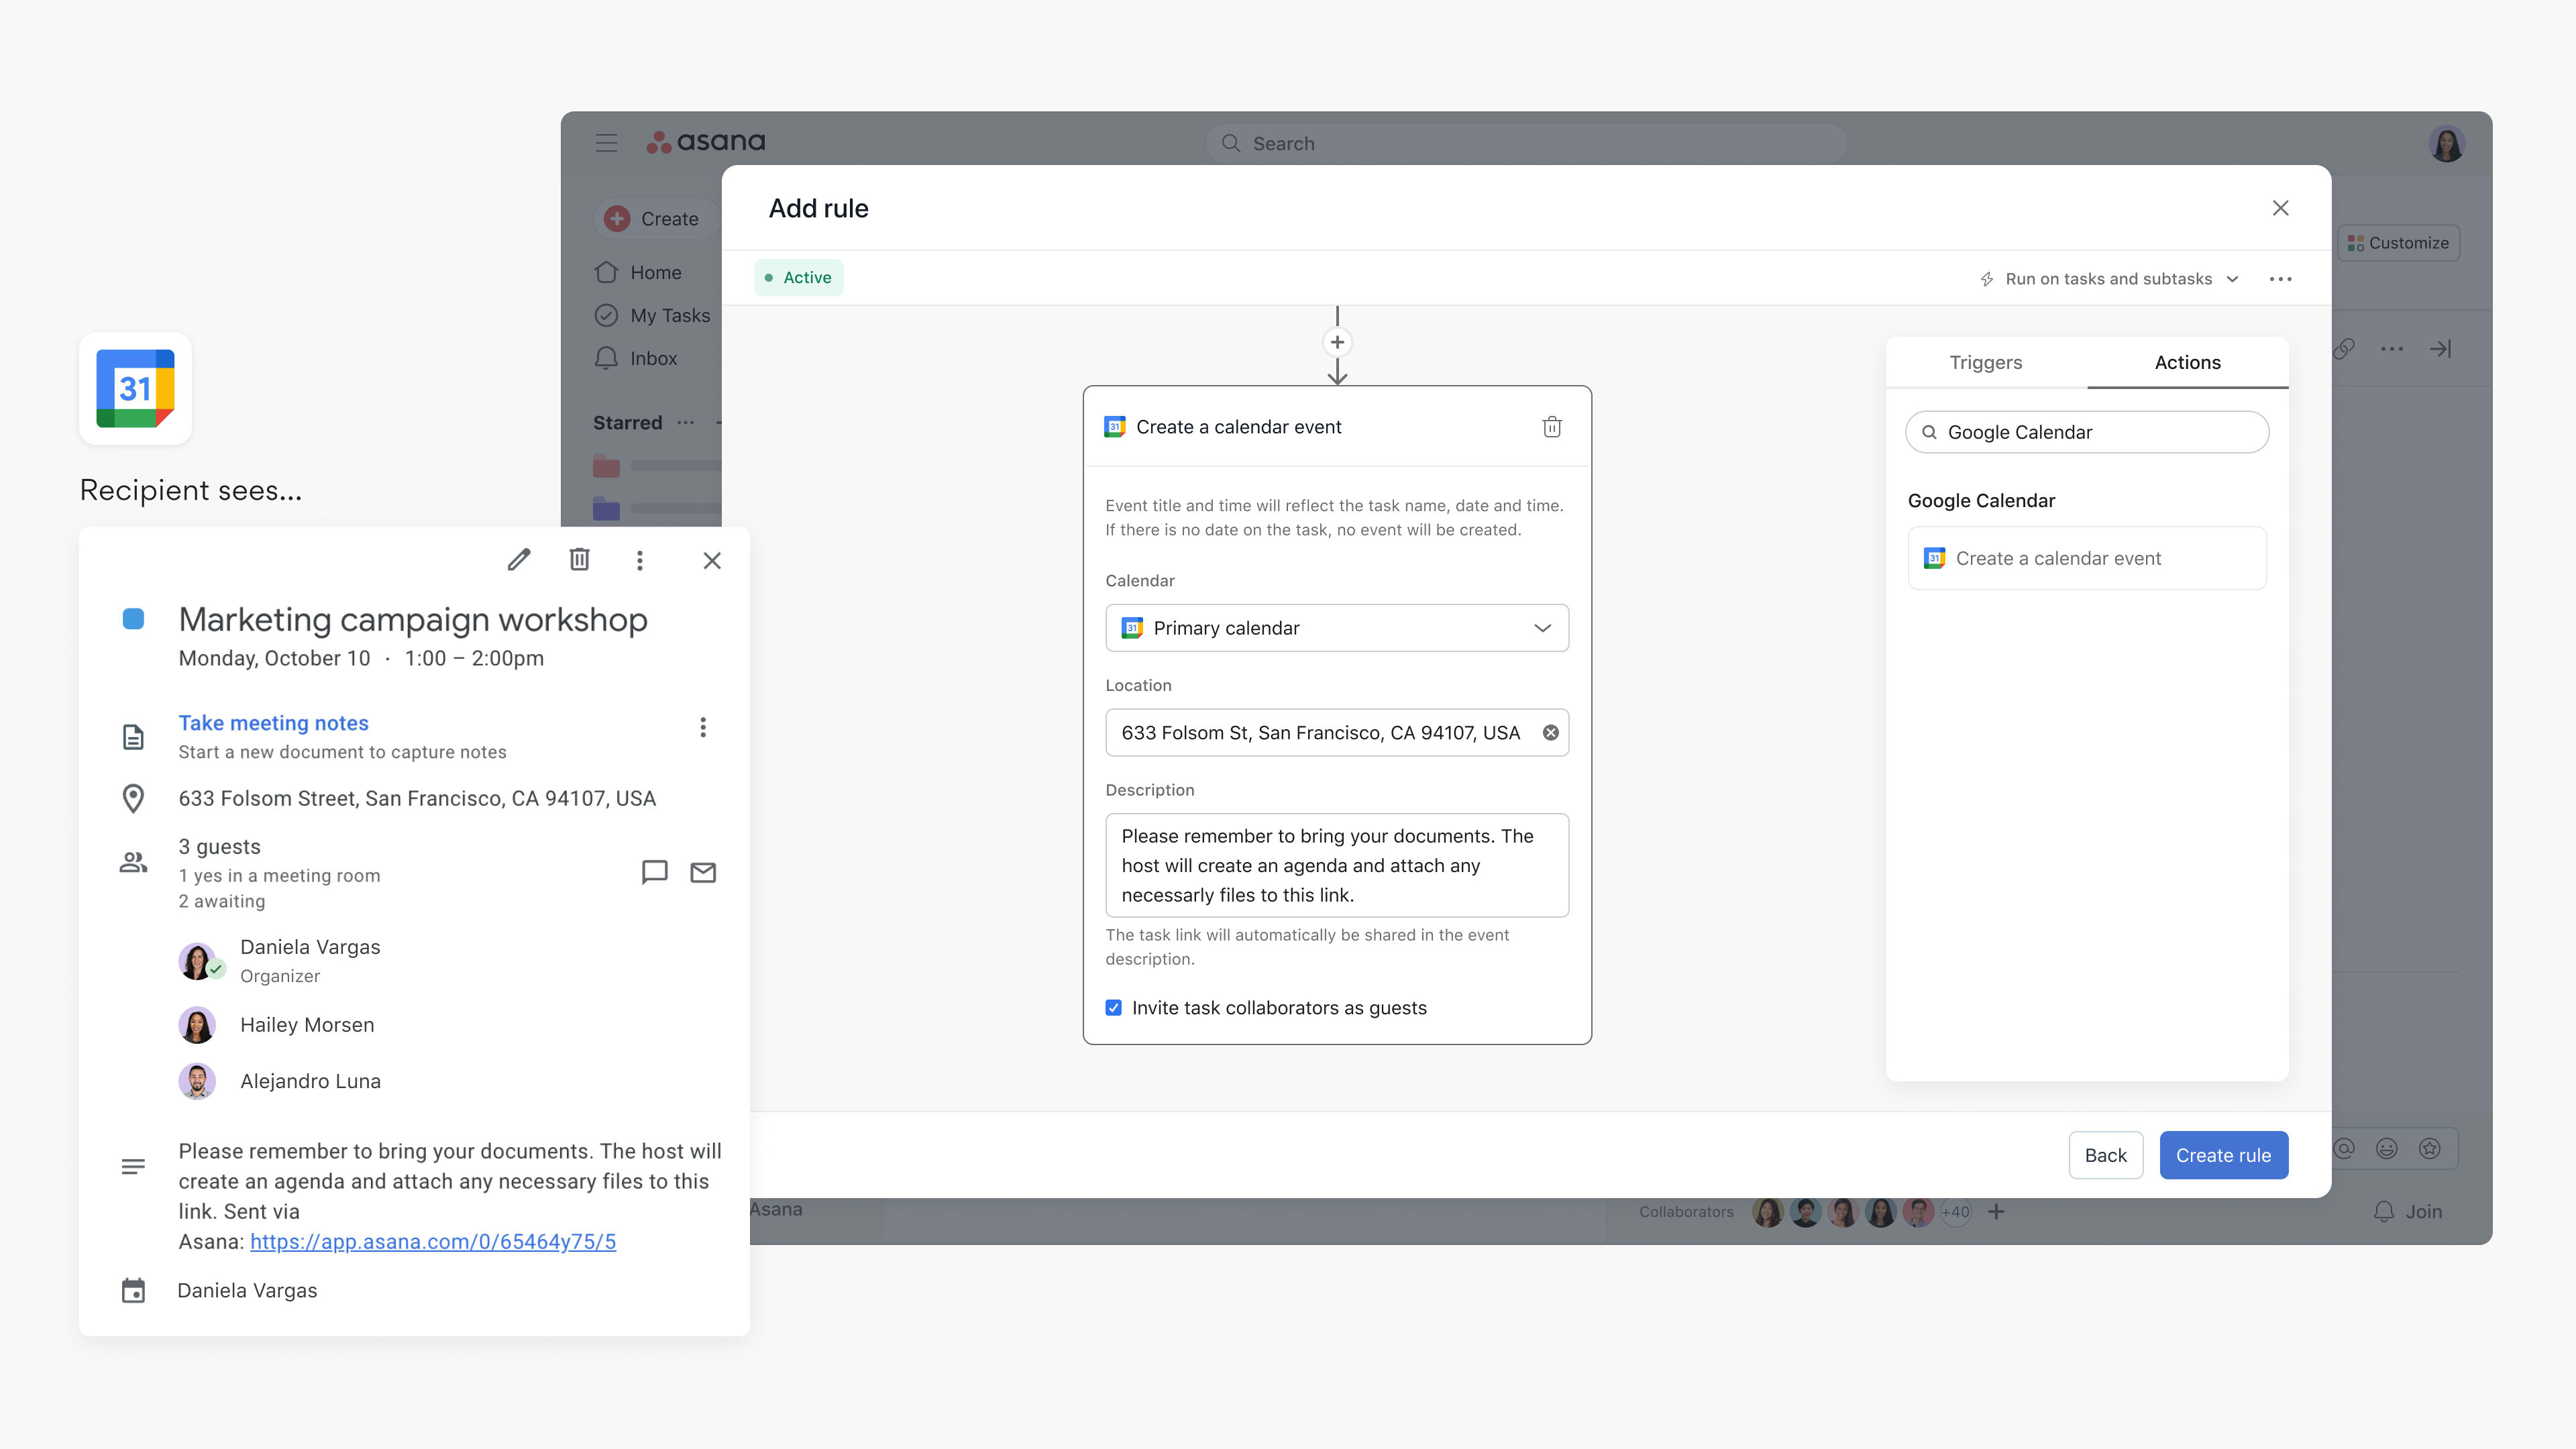
For example, using rules, teams can create a trigger that adds an event to a team calendar when a task is moved to a "Scheduled" section and also invites task collaborators to the event. Teams can also use this for recurring task scenarios; i.e., they can create a recurring "Send agenda for meeting" task, which sends out an event invite when the task is completed.
Steps to configure rules integration
- Navigate to the specific Asana project where you’d like to add a rules integration
- Click Customize in the top-right corner, navigate to Rules, and select + Add rule
- Select Google Calendar from the left column
- Either select a preset rule or click Create custom rule
- If creating a custom rule, add a name, and choose a trigger and action to get started
- Authenticate by clicking Connect to Google Calendar Rules
- Sign in with your Google account and click Allow
- Fill out the fields for the Google Calendar event
- Optionally, invite task collaborators as event guests
Adding events to tasks as widgets
Teams can also add event widgets to tasks to link related work and show key details on the task, such as event time and organizer. For example, when scheduling a client meeting, users can link the meeting to a task so that task collaborators know the meeting has been scheduled. Event widgets will be automatically added for events created by the "Google Calendar with Rules" integration.
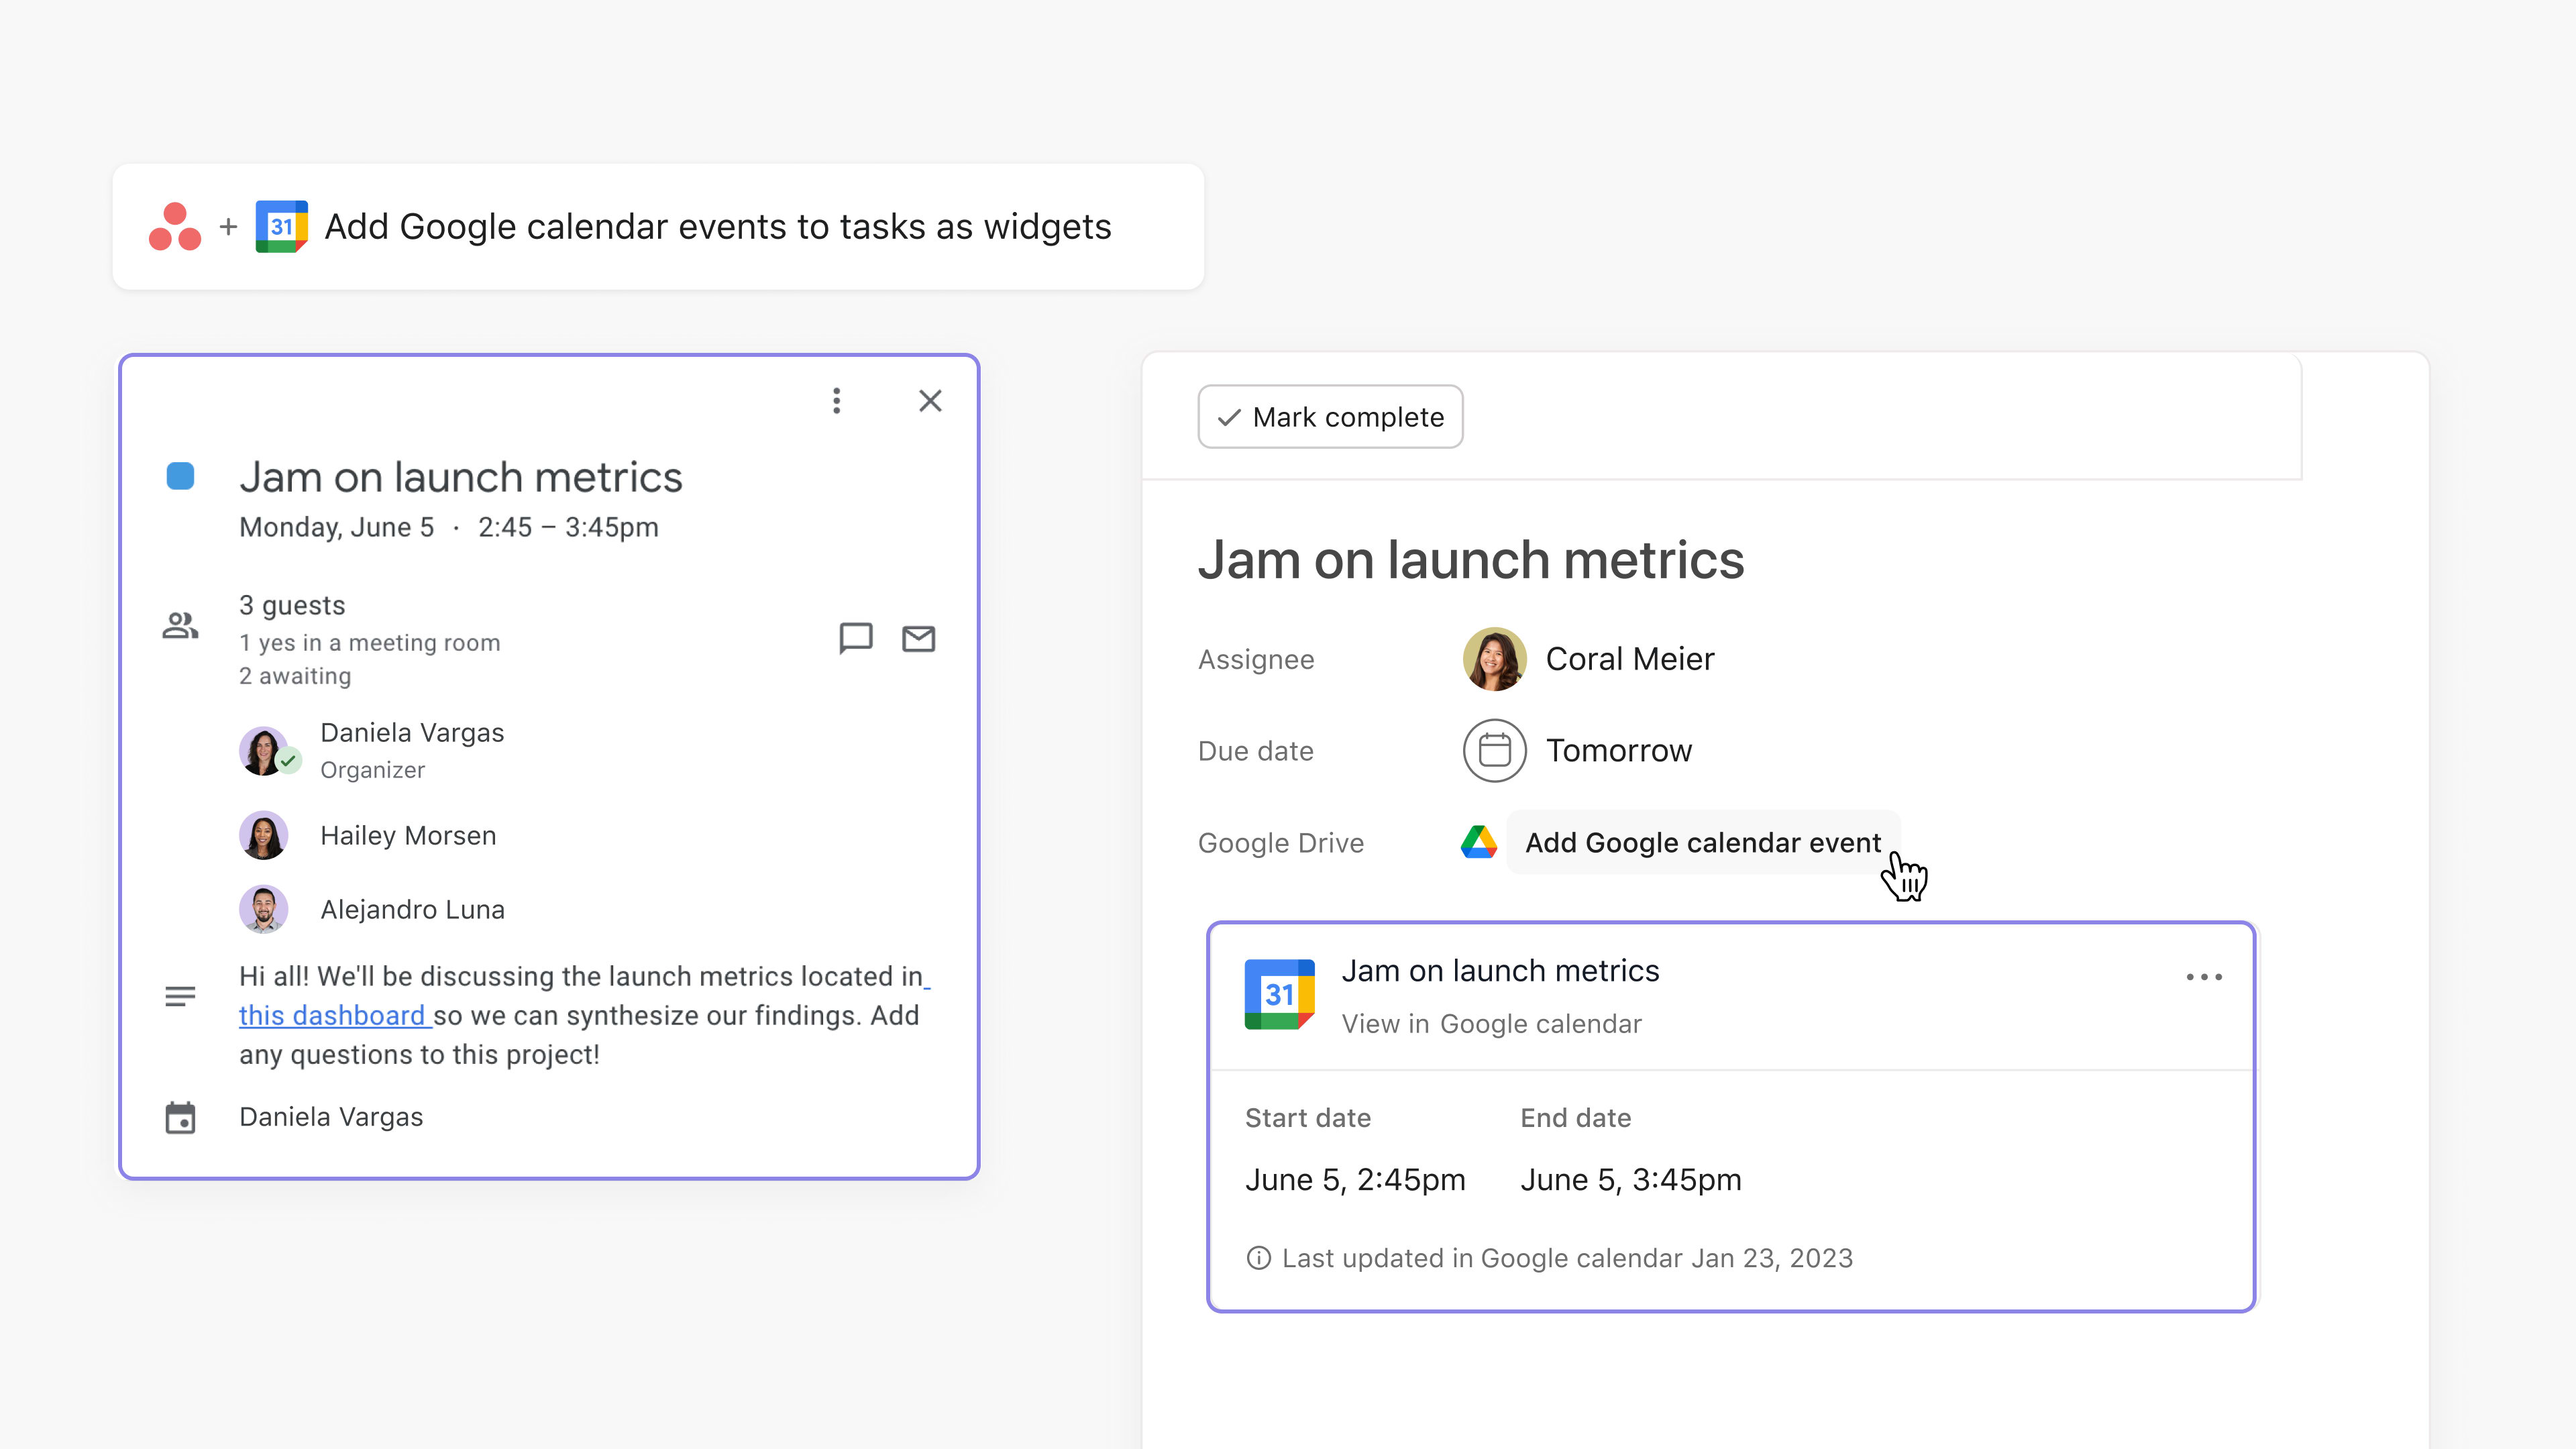
After you’ve set up the Google Calendar integration, here’s how to set up the data sync setting for event widgets:
- Click Customize in the top-right corner of the Asana project that you’d like to add this setting to, and navigate to Apps
- Select Google Calendar, and navigate to the Data sync setting tab
- Select the calendar for sync (Note: This setting only applies to calendars where you are the event organizer)
- Select the task fields that should be connected to event fields
- Select Save and close to activate the setting
Data sync setting for event widgets
With the data sync setting, teams can easily ensure events stay updated with the tasks that were used to schedule them. This setting allows teams to configure the Asana task fields that should stay updated in the calendar event if an event is attached.
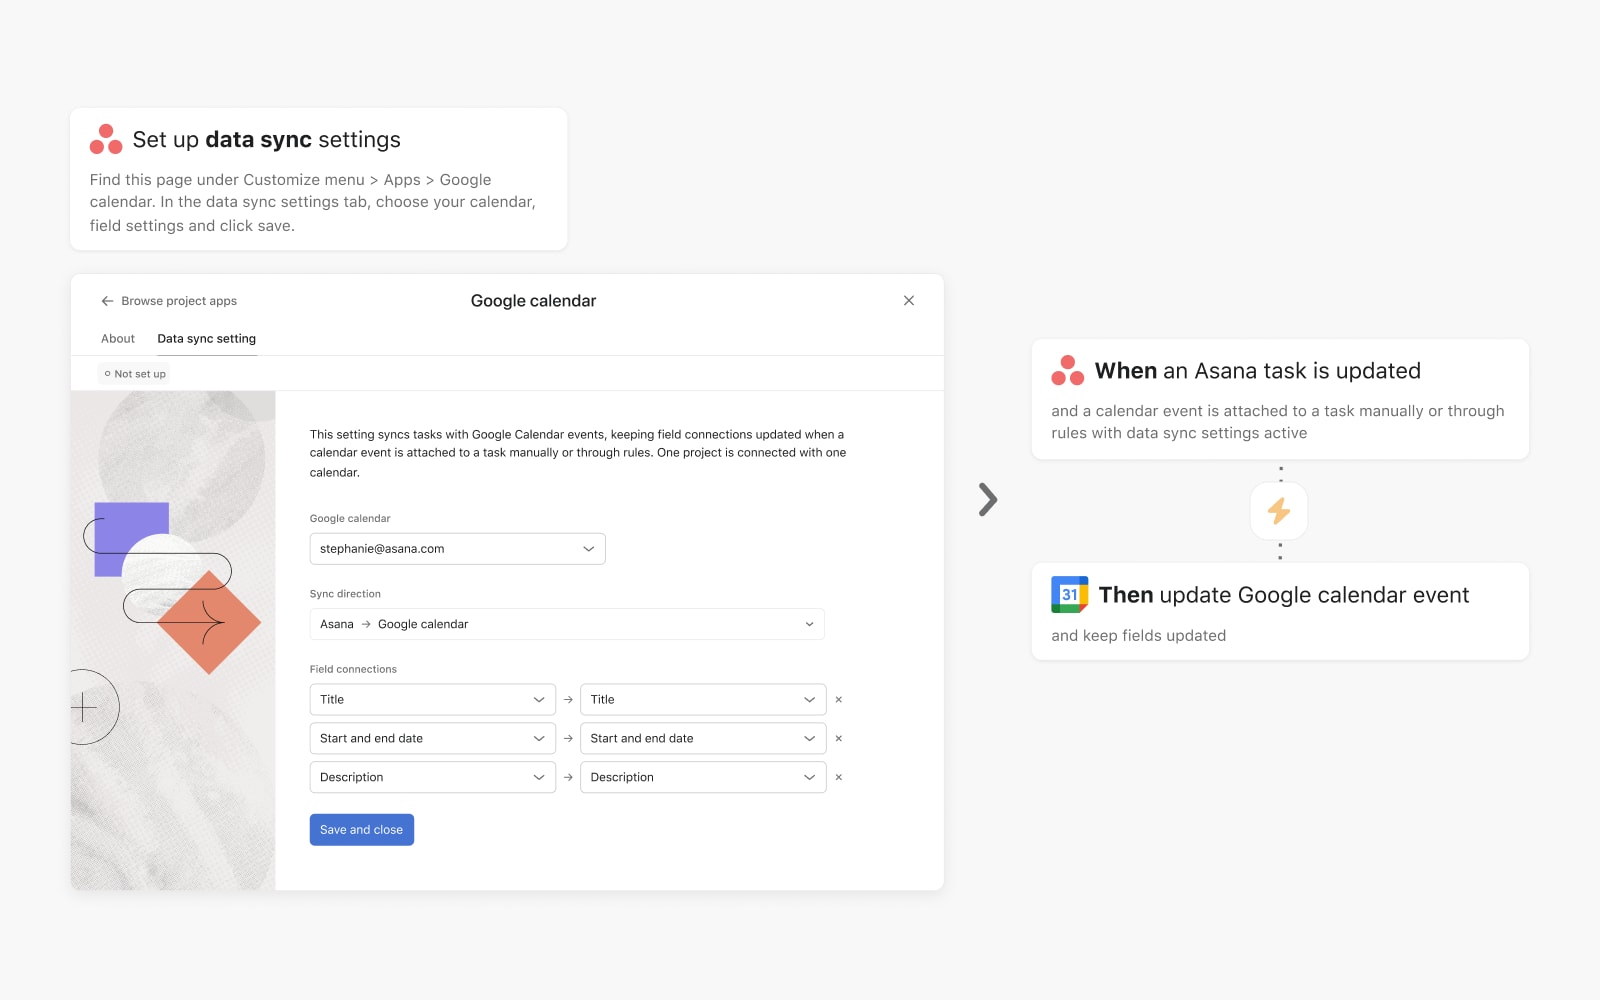
For example, if a rule is used to automatically schedule an event, the event organizer can edit the due date and time from the Asana task, and the change is reflected in the calendar event.
Project sync for all project tasks
Learn how to sync tasks from your project or My tasks to your Google Calendar here.
Dropbox
With Asana Rules, teams can automatically upload task attachments to a specific Dropbox folder to streamline sharing, storage, and collaboration. Teams can go from manually transferring files to choosing triggers that automatically and securely upload task attachments to Dropbox for easy reference.
For example, teams can use Asana to work on asset approvals and, following approval, automatically upload the task attachment to a specific Dropbox folder to ensure final assets get uploaded to the correct location.
Considerations when using this integration:
- Rules that trigger on tasks with more than 10 attachments will upload only the most recent 10 attachments.
- File uploads where the file has the same name as an existing file in the associated Dropbox folder will be automatically renamed and successfully uploaded.
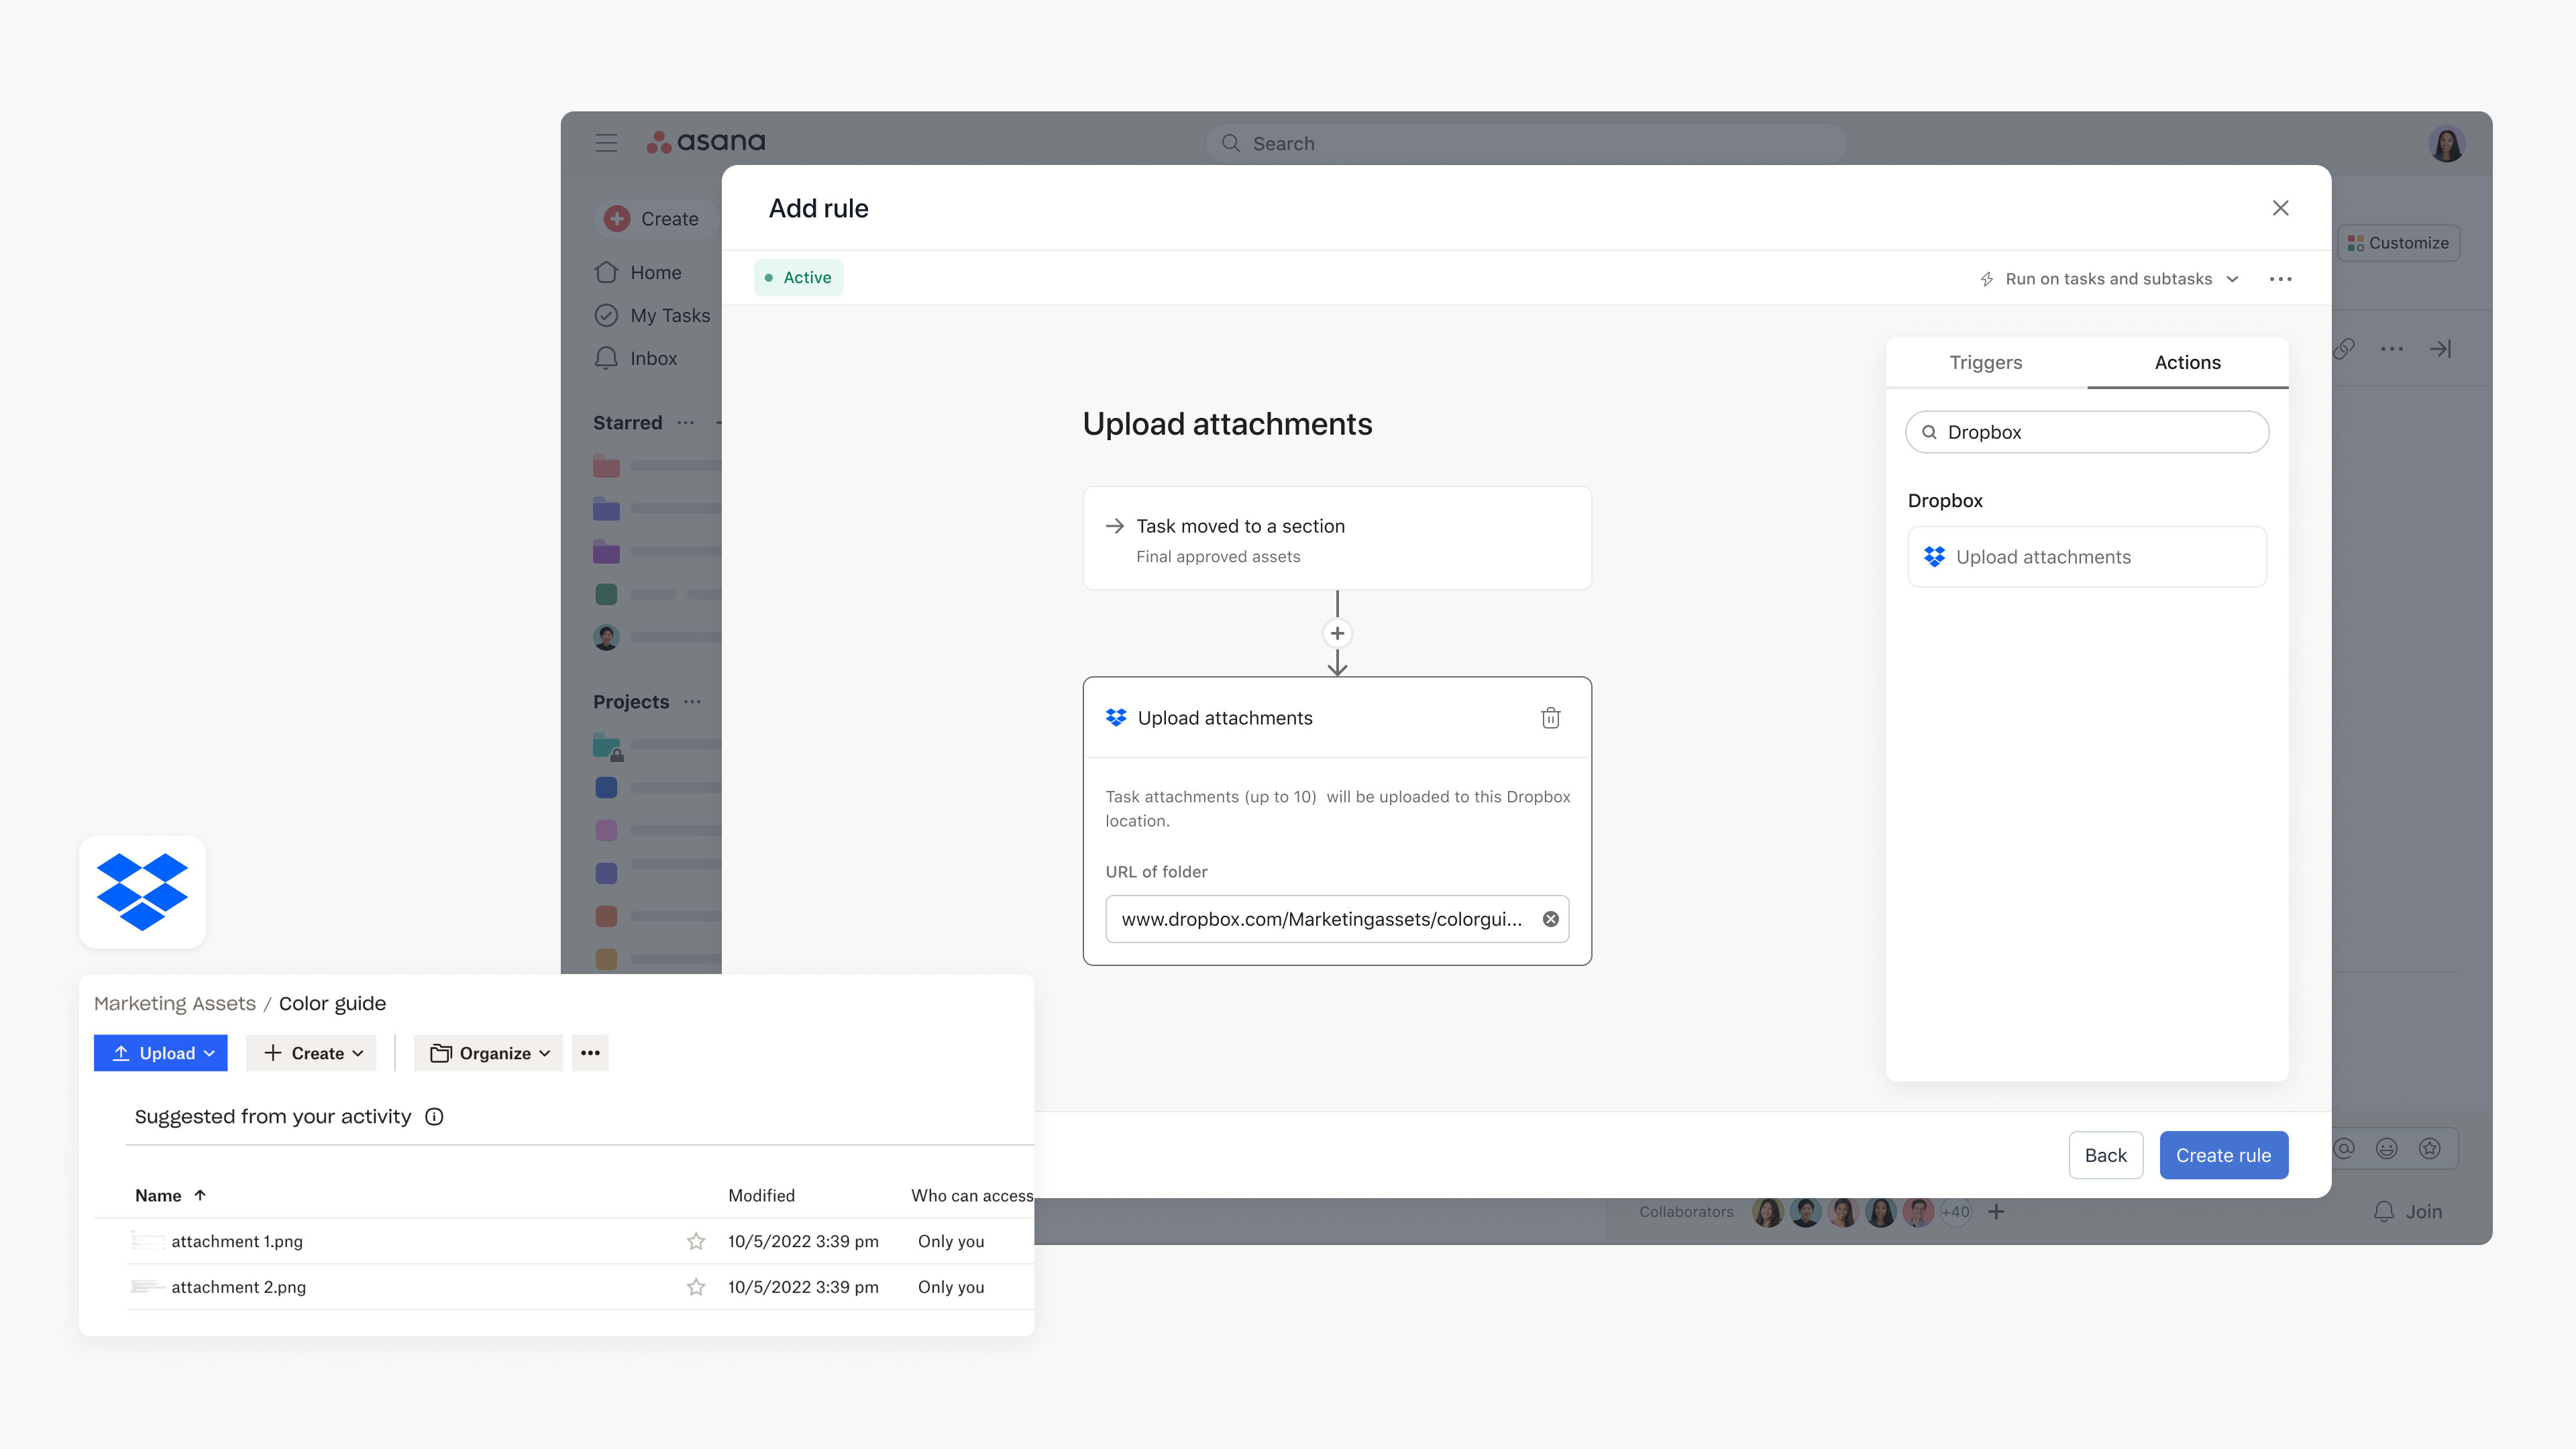
Steps to configure rules integration
- Navigate to the specific Asana project where you’d like to add a rules integration
- Click Customize in the top-right corner, navigate to Rules, and select + Add rule
- Select Dropbox from the left column
- You can select a preset rule or click Create custom rule
- If creating a custom rule, add a name, and choose a trigger and action to get started
- Authenticate by clicking Connect to Dropbox Rules and following the steps
- Add the Dropbox folder URL found in the web app
Note: Desktop app URLs are not currently supported. The web app URL must be used instead.
Box
Use Asana Rules to automate the process of uploading content to Box when certain actions take place in Asana. Teams can save time by setting triggers that will automatically transfer attachments from your Asana tasks to Box.
For example, design teams working on assets can create a rule to upload the attachment to Box once the task moves to the “Final approved assets” section.
Considerations when using this integration:
- Rules that trigger on tasks that have more than 10 attachments will upload only the most recent 10 attachments.
- Attempted uploads of files with the same name as an existing file in the Box folder will result in an error to the rule. To fix this error, rename the existing file, edit and resave the rule, and trigger the upload action again.
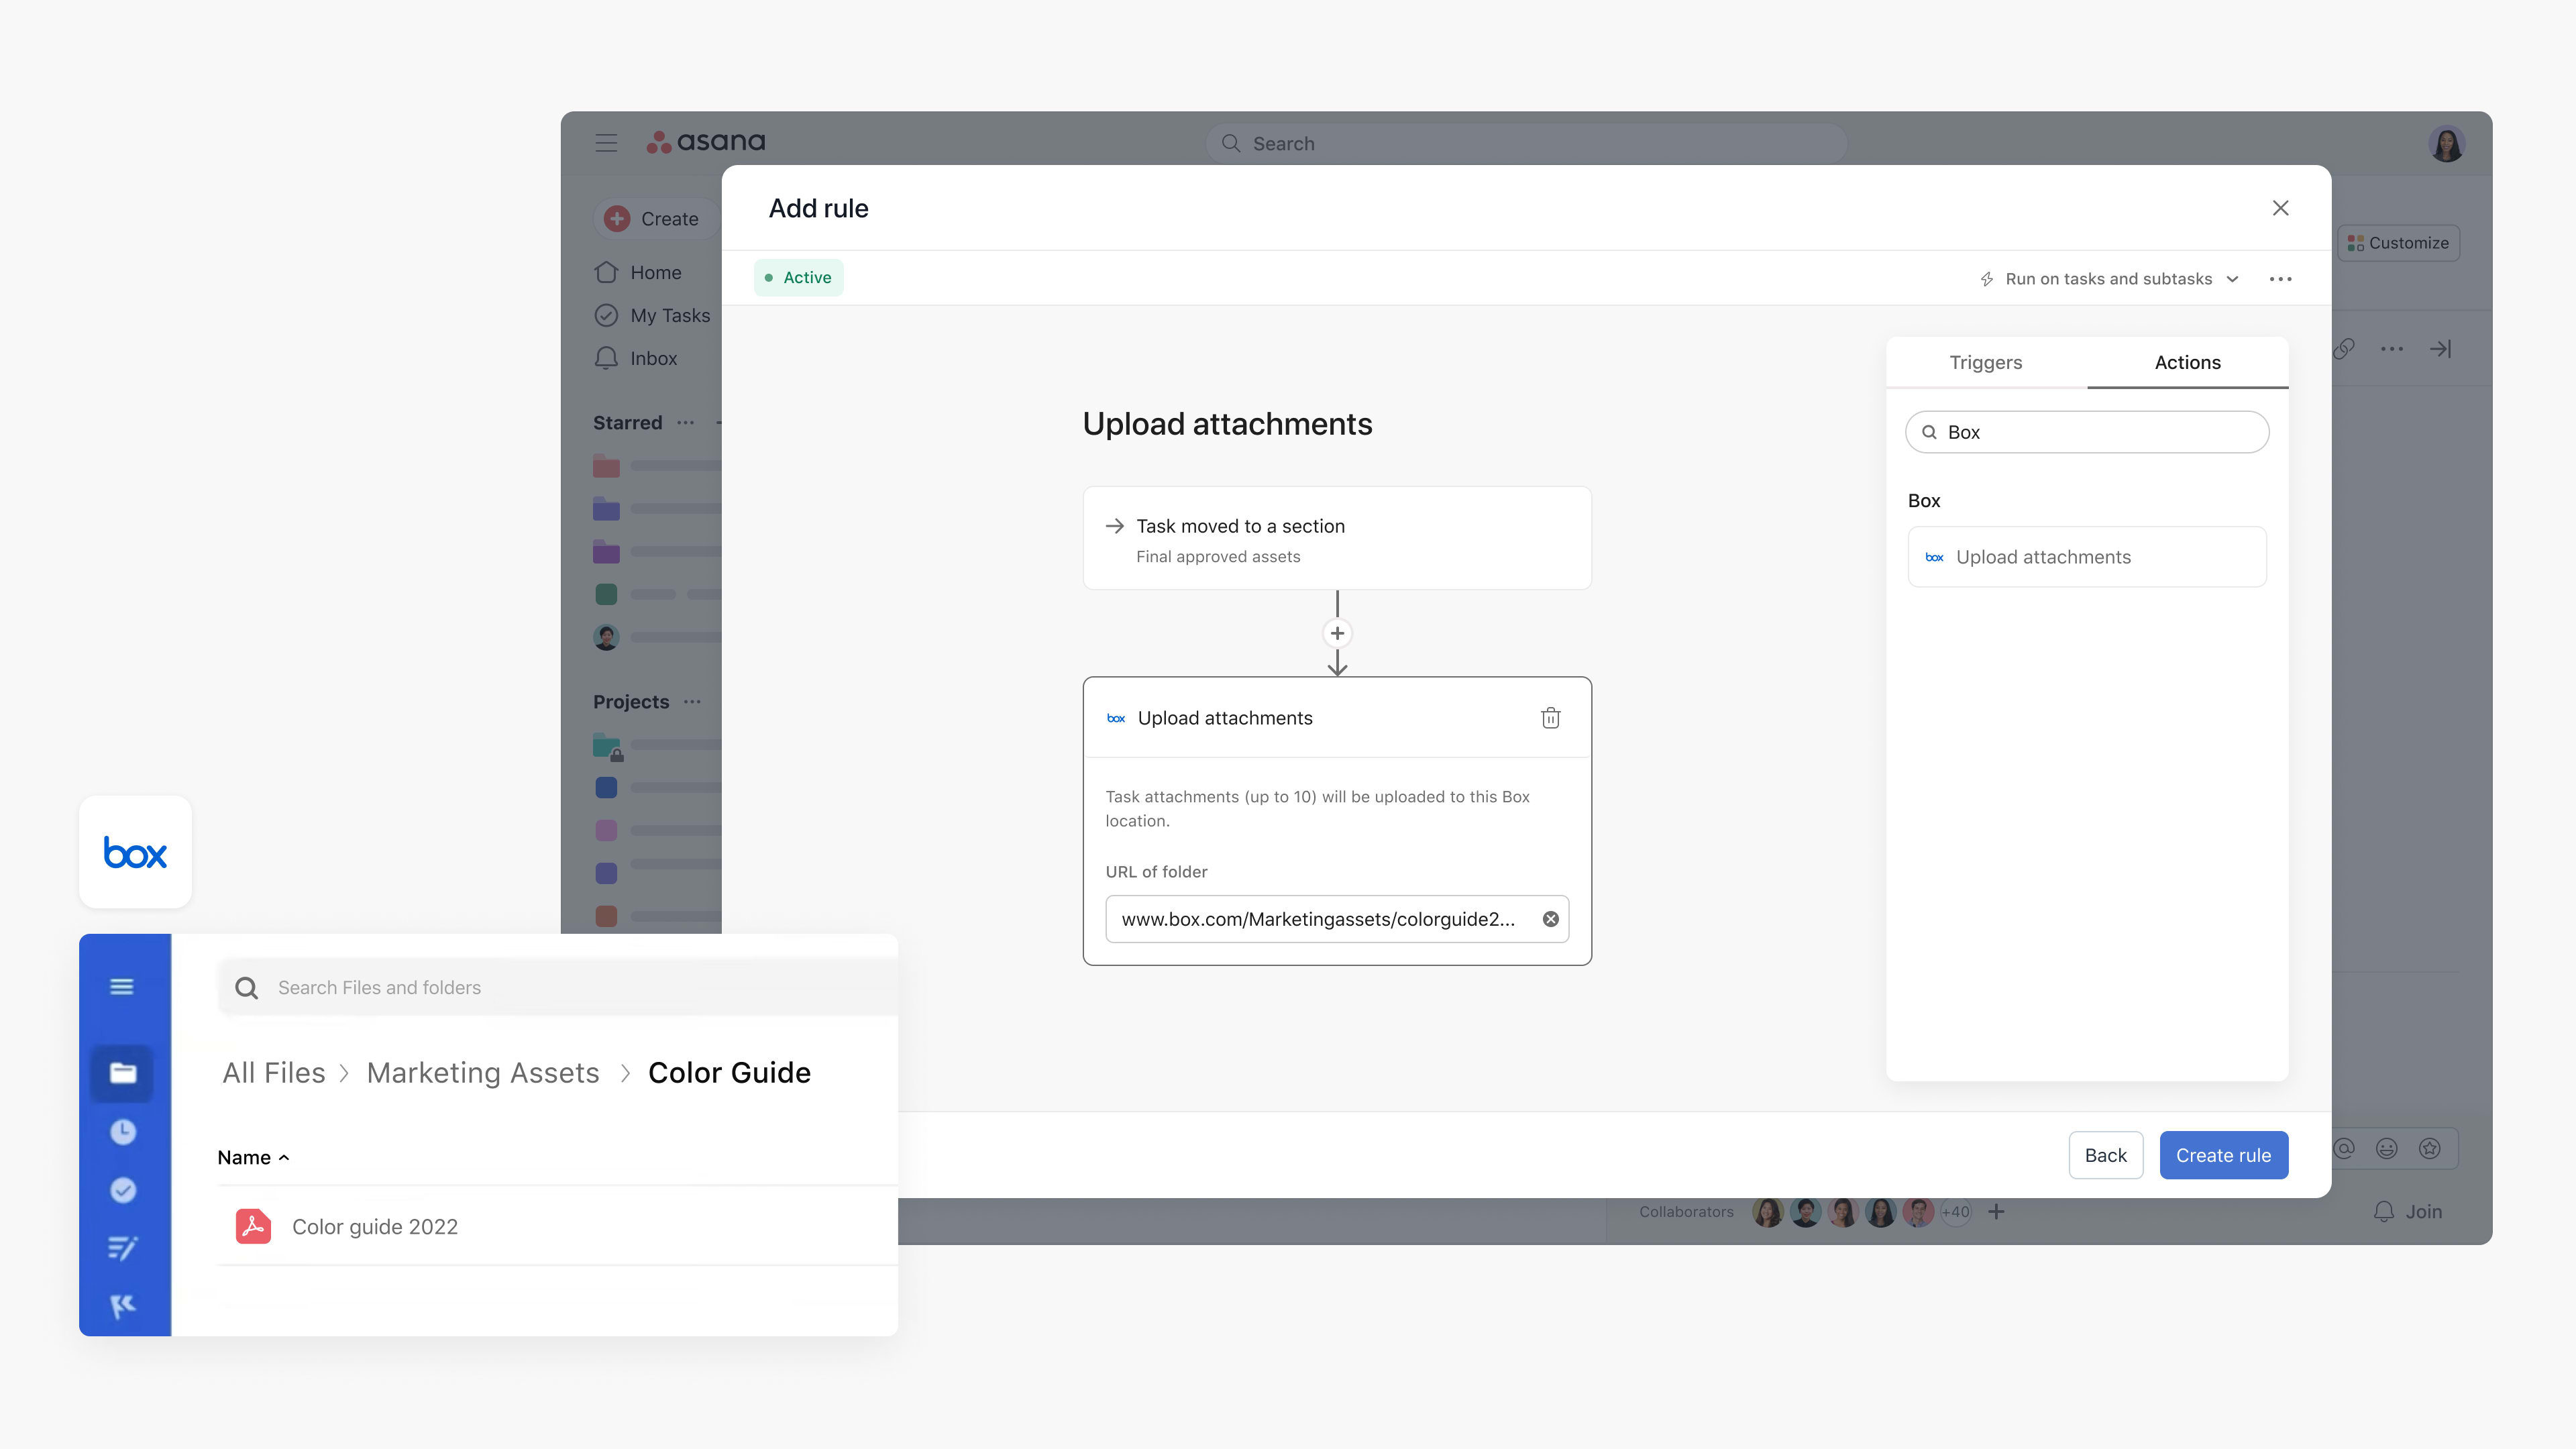
Steps to configure rules integration
- Navigate to the specific Asana project where you’d like to add a rules integration
- Click Customize in the top-right corner, navigate to Rules, and select + Add rule
- Select Box from the left column
- You can select a preset rule or click Create custom rule
- If creating a custom rule, add a name, and choose a trigger and action to get started
- Authenticate by clicking Connect to Box Rules and following the steps
- Add the Box folder URL found in the web app
Microsoft OneDrive
With Asana Rules, teams can automatically upload task attachments to a specified OneDrive folder to streamline sharing, storage, and collaboration, while reducing manual work.
For example, teams can use Asana to work on asset approvals and, following approval, automatically upload the task attachment to a specified OneDrive folder to ensure final assets get uploaded to the correct location.
Please note that this integration works with OneDrive, not Sharepoint. Work or school accounts are not supported with this integration.
Considerations when using this integration:
- Rules that trigger on tasks that have more than 10 attachments will upload only the most recent 10 attachments.
- Files uploaded where there is an existing file by the same name in the OneDrive folder will replace the existing file. If this is not intended, ensure files have different names.
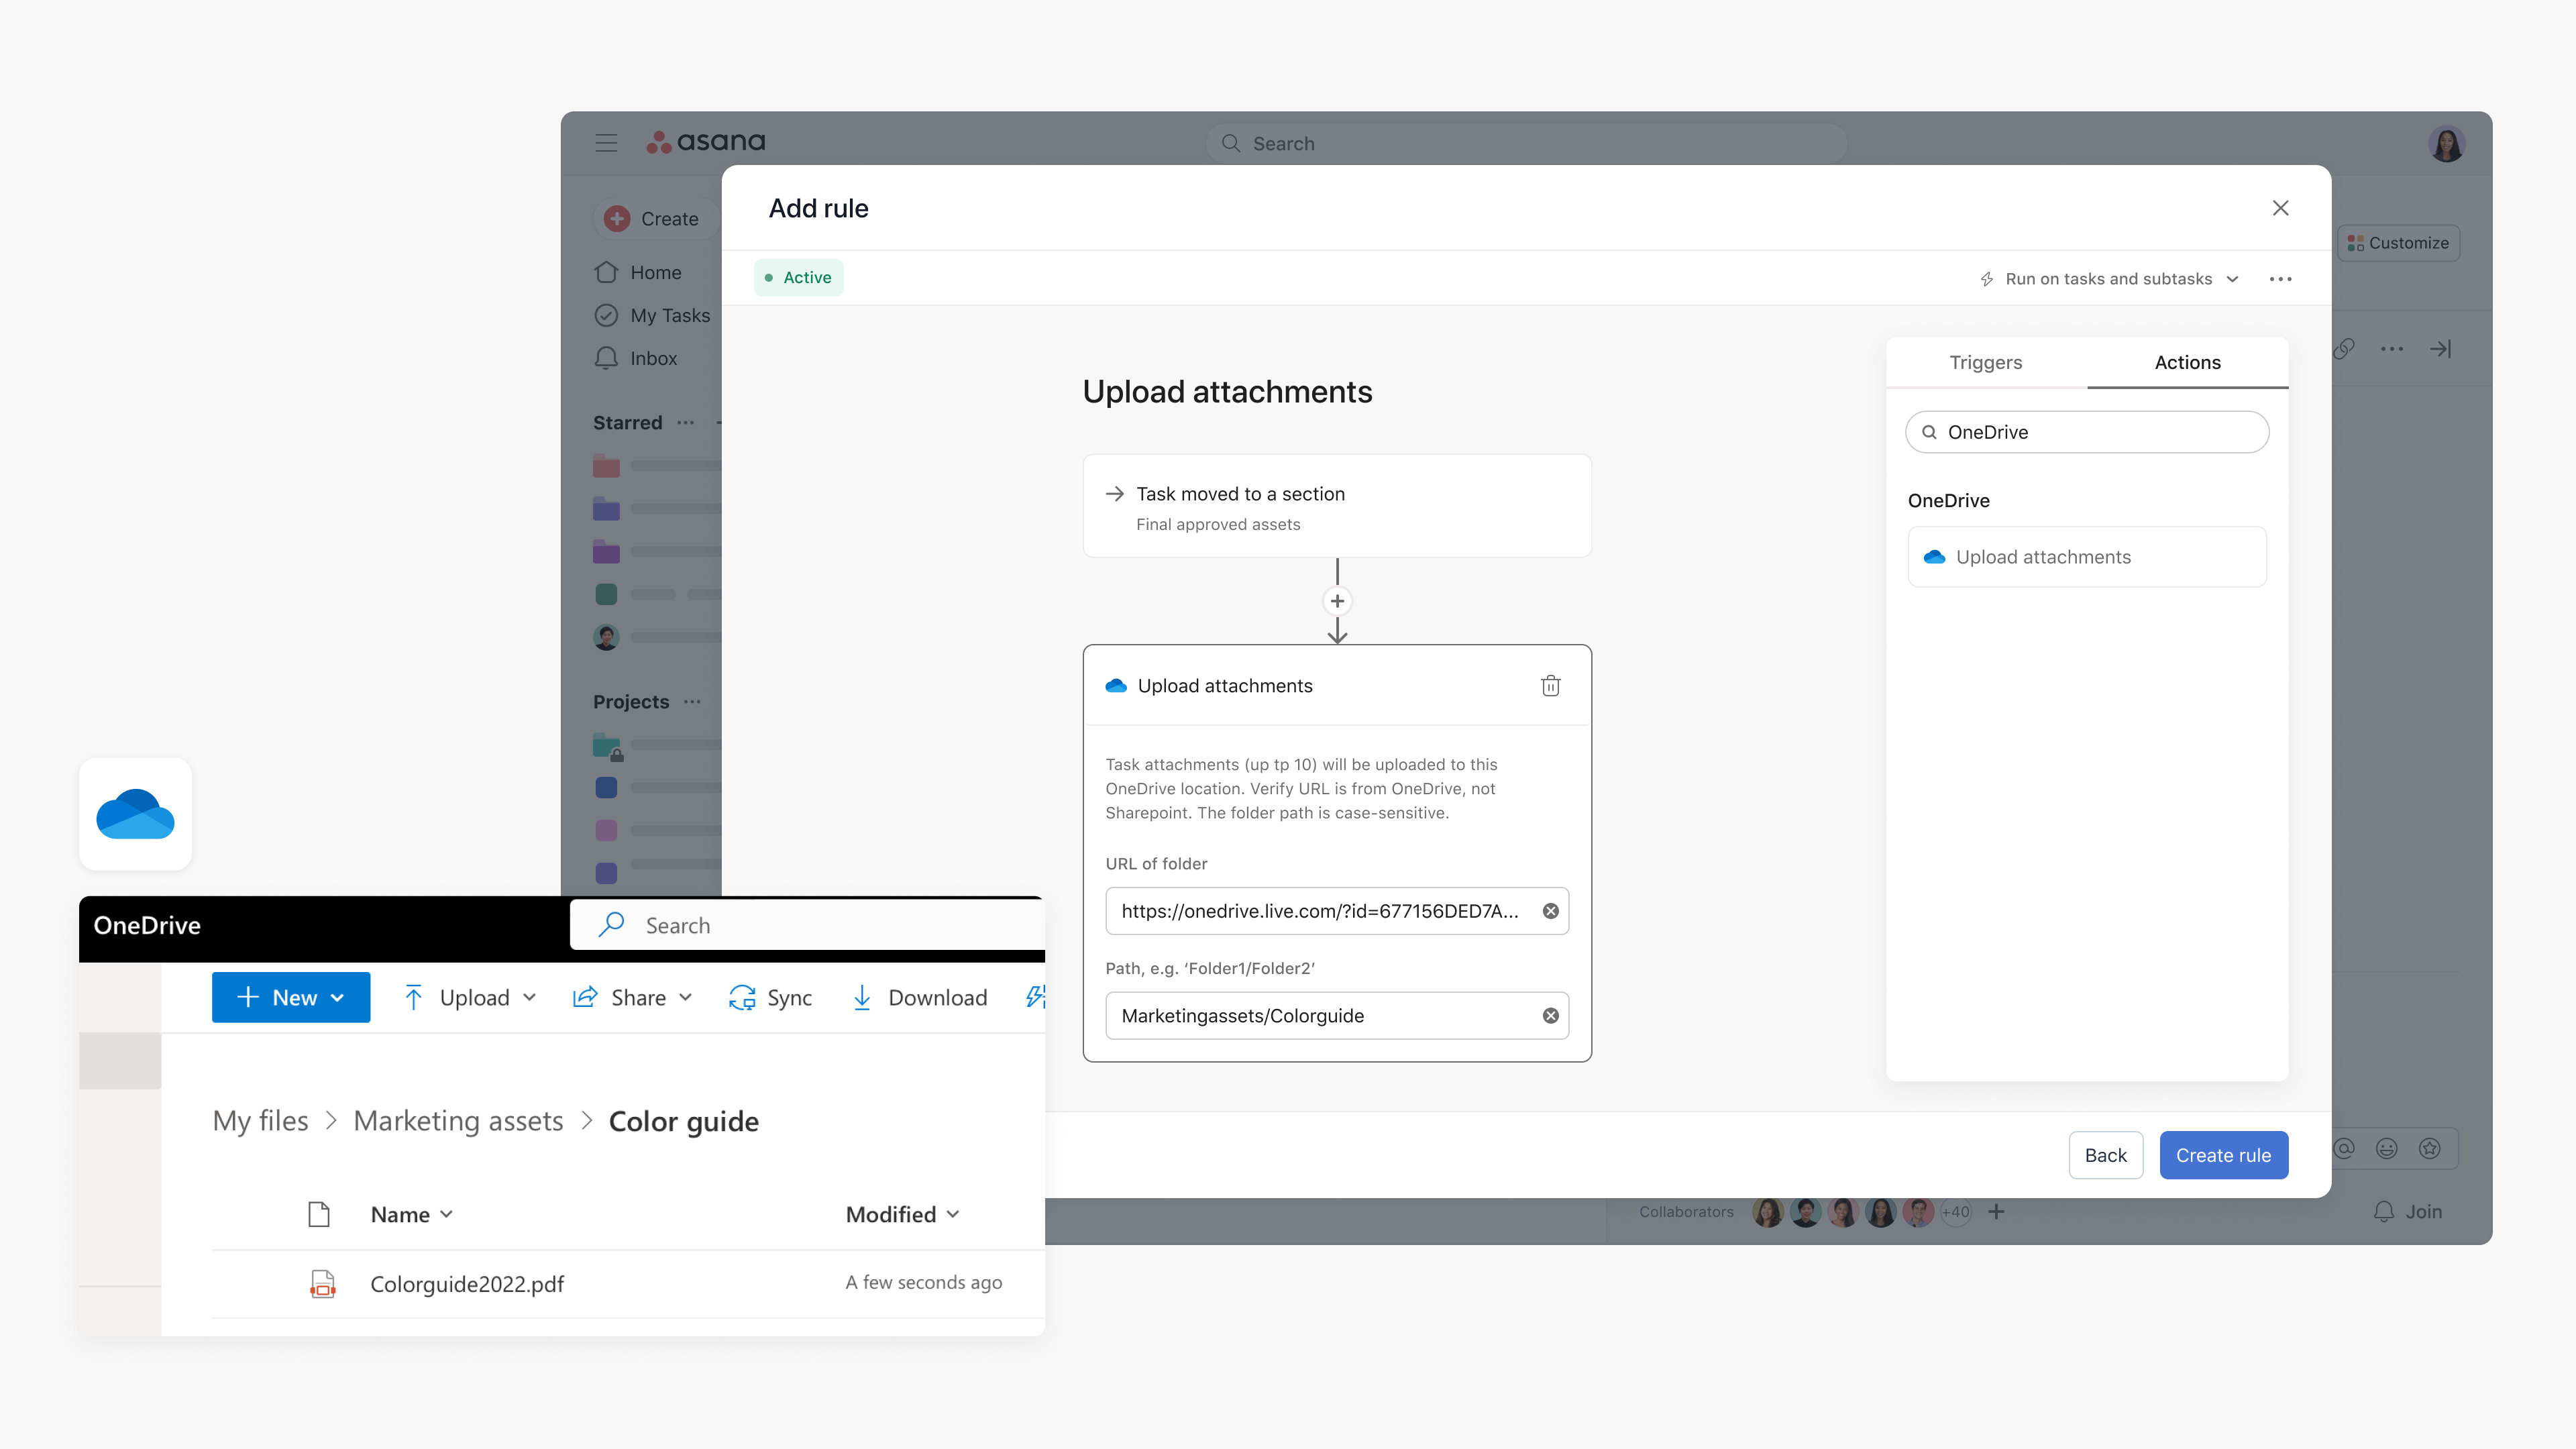
Steps to configure rules integration
- Navigate to the specific Asana project where you’d like to add the integration
- Click Customize in the top-right corner, navigate to Rules, and select + Add rule
- Select OneDrive from the left column
- You can select a preset rule or click Create custom rule
- If creating a custom rule, add a name, and choose a trigger and action to get started
- Authenticate by clicking Connect to OneDrive Rules and following the steps
- Add the OneDrive folder URL found in the web app, and the path. The path can be found in More details of the OneDrive folder. My files should be excluded from the path.
HubSpot
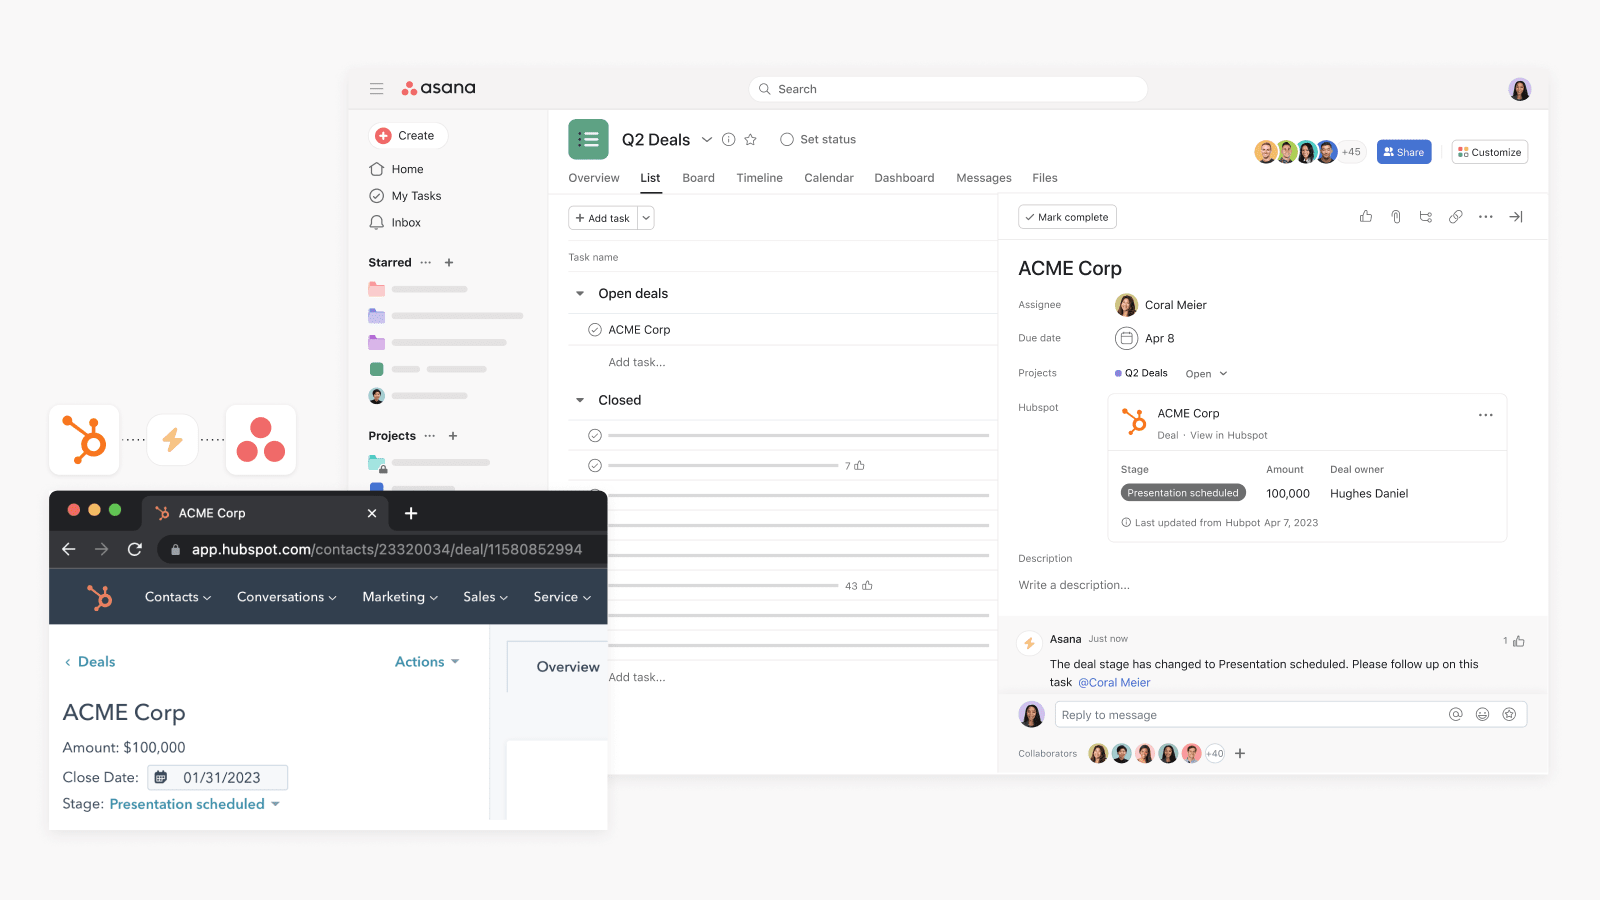
The HubSpot + Asana integration allows teams to keep track of important context from deals and marketing campaigns across apps. Track campaign performance and collaborate with teams in one location, without having to switch between tools.
Easily attach details from HubSpot deals directly into an Asana task, to track relevant information like the deal amount and deal owner.
Quickly add your chosen campaign from HubSpot by clicking the HubSpot field from your task view. Attach campaigns relevant to the tasks you're tracking in Asana, so you can view accurate HubSpot campaign statuses and metrics while working on Asana tasks.
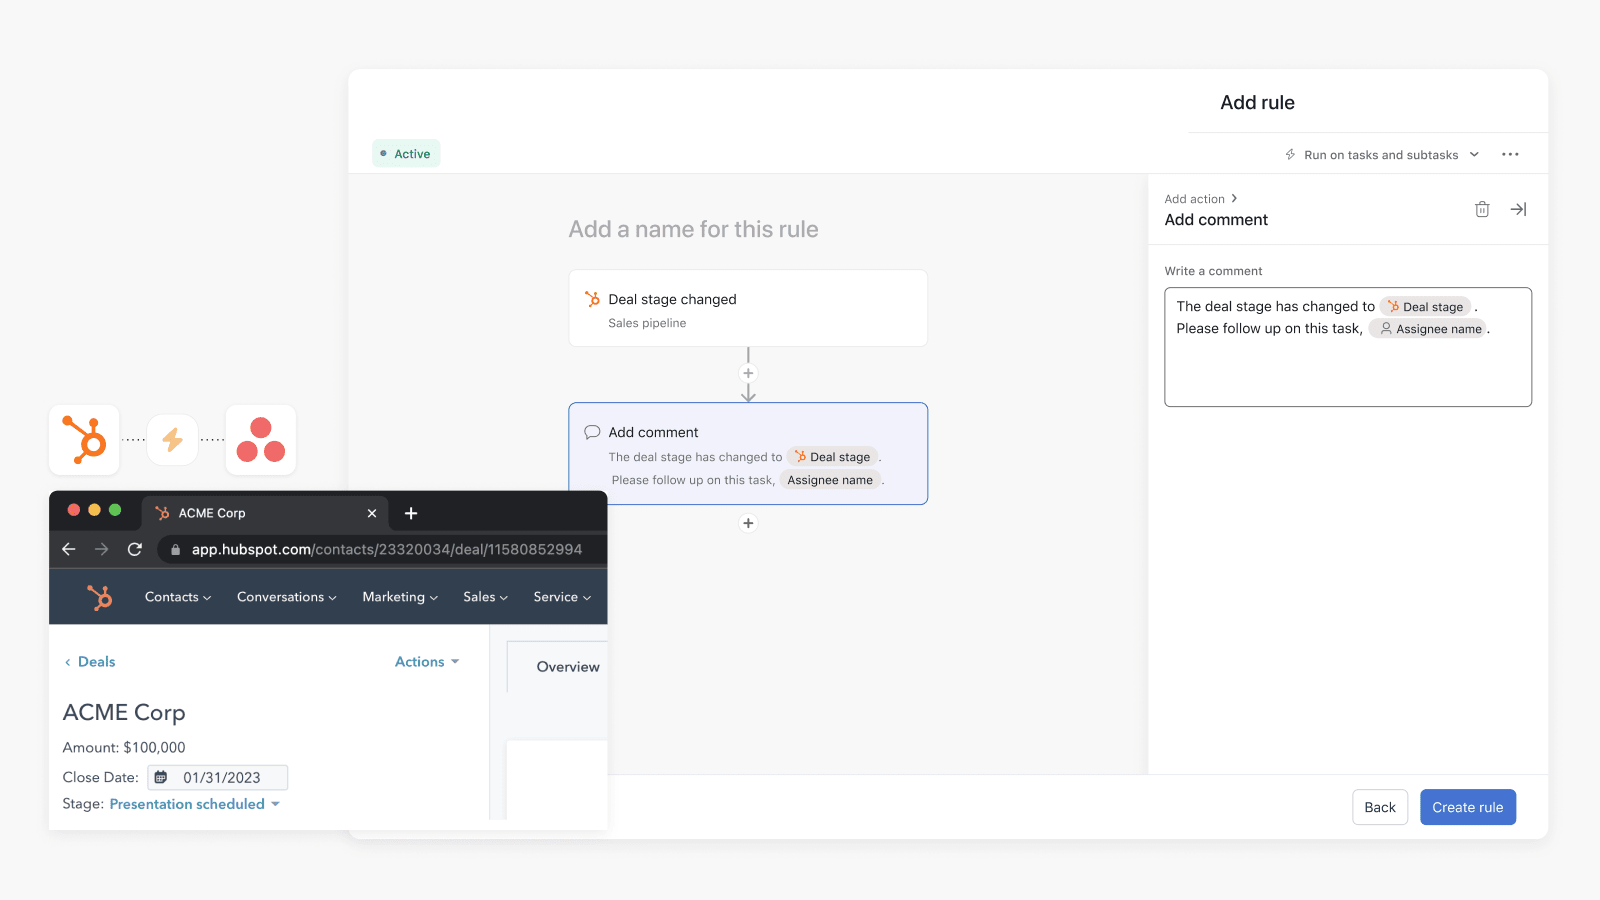
With Asana rules, teams can automatically create Asana tasks or comments when changes happen in a Hubspot deal.
For example, when a deal is created in a particular Hubspot pipeline, this integration allows for an Asana task to be automatically created so that work related to new opportunities can be tracked in Asana.
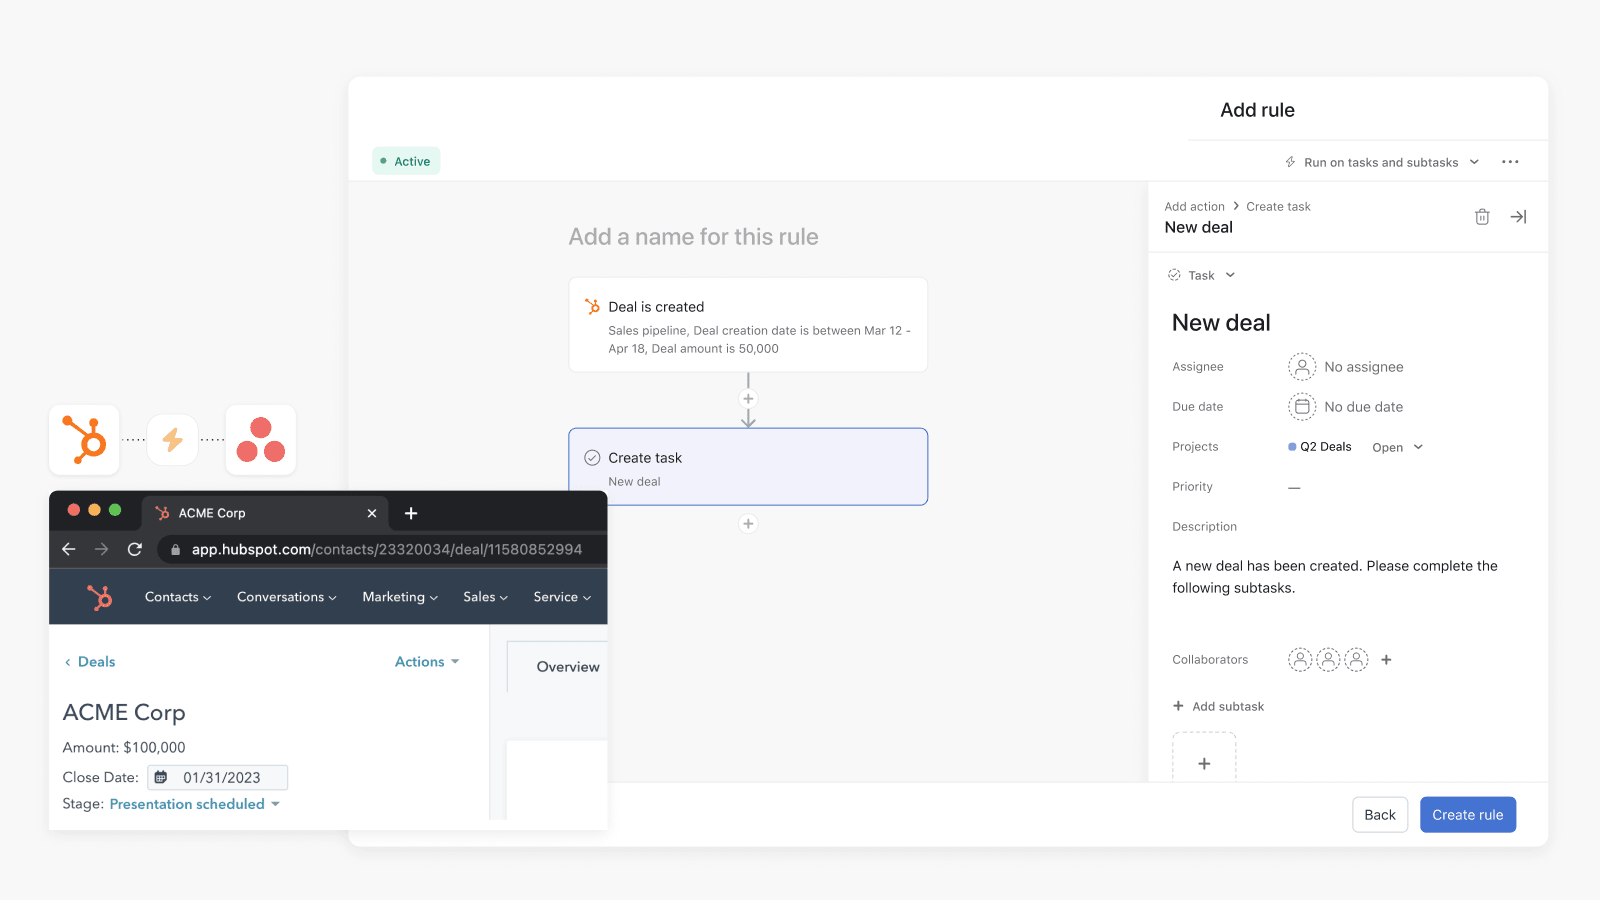
If a deal has progressed to a new stage, users can configure this integration so that an Asana task will be automatically created and assigned to a team member in Asana. Other configurations include automatically adding comments to an Asana task when an associated deal amount changes in HubSpot.
Teams planning email campaigns in Asana can also add a HubSpot marketing campaign widget to an Asana task to track and monitor campaign metrics.
For example, if a deal has progressed to a new stage in HubSpot, teams using Asana to coordinate next steps can see important information such as deal amount and deal owner in Asana.
Teams can quickly add their chosen deal or email campaign from HubSpot by clicking the HubSpot field from the task view. Attach deal or email campaigns relevant to the tasks you're tracking in Asana, so you can view HubSpot deal information, campaign statuses, and metrics in one central place.
All of this helps reduce the time spent switching between tools and creates real-time visibility between teams.
Here’s how to attach a HubSpot deal or marketing campaign to an Asana task:
- Log into Asana, and find the project where you want to enable the HubSpot widget
- Click on Customize in the upper right-hand corner
- Scroll down to the Apps section, then select +Add app
- Select HubSpot
- Click Add to project and follow the steps to connect HubSpot to Asana
- Link a deal or a marketing campaign to a task by clicking the Add HubSpot deal or marketing email button under the HubSpot field at the top of the task details pane
- Insert the URL for your relevant HubSpot deal or email
- Attached HubSpot details will appear as a widget in the task pane
Note: This integration is already built into Asana, but you need to sign up for a HubSpot account to get started.
The HubSpot widget is available with an Asana Premium, Business, or Enterprise subscription.
Notion
The Notion + Asana integration allows teams to streamline work by automatically creating Notion pages in Asana and adding Notion pages to Asana tasks. Rather than manually creating Notion pages and linking those to relevant Asana tasks, you can use automation to create a Notion page when certain actions take place in Asana, such as when a task is moved to a section.
For example, teams that are conducting research interviews in Asana tasks can automatically create a Notion page to take notes when the task moves to the "Interview scheduled" section. You can also link existing Notion pages to an Asana task so that collaborators can see relevant context from the page, streamlining collaboration across multiple apps. Notion’s integration with Asana also allows you to view the status of Asana projects and tasks as link previews in Notion.
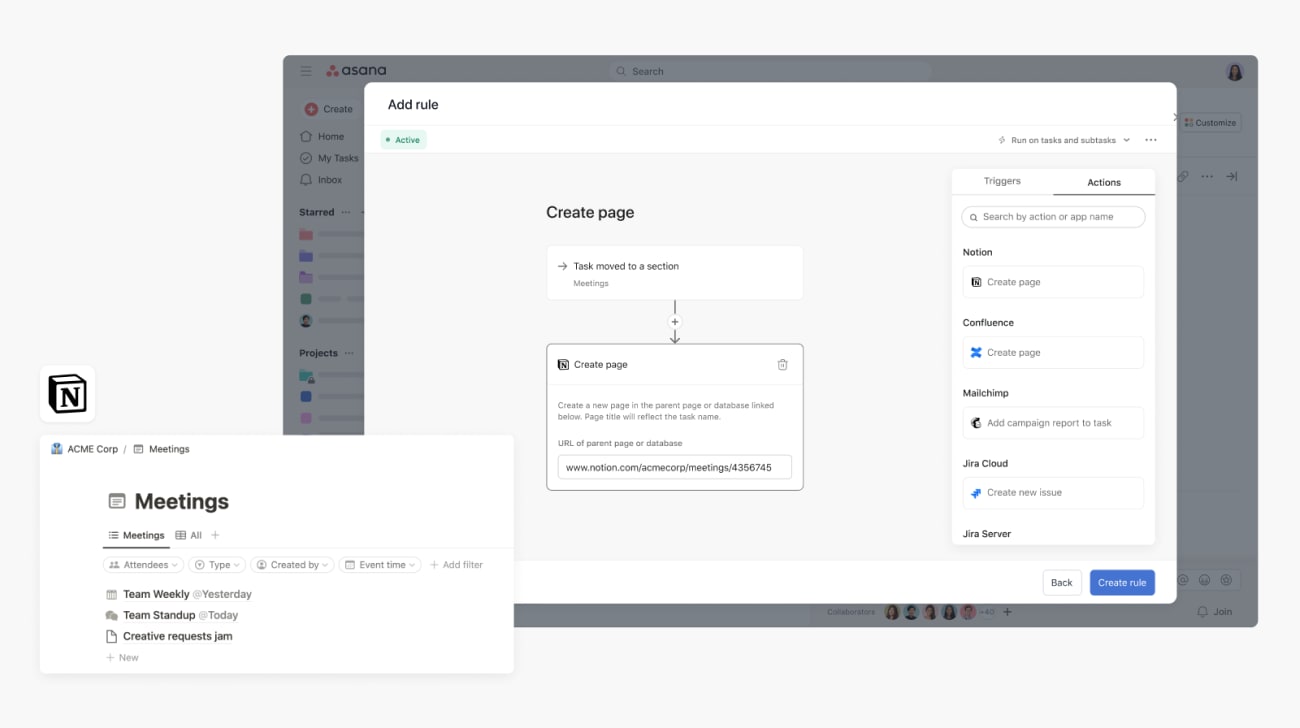
Steps to configure rules integration
- Navigate to the specific Asana project where you’d like to add a rules integration
- Click Customize in the top-right corner, navigate to Rules, and select + Add rule
- Select Notion from the left column
- You can select a preset rule or click Create custom rule
- If creating a custom rule, add a name, and choose a trigger and action to get started
- Authenticate by clicking Connect to Notion and following the steps
- Click Select pages to allow Asana access
- Select the pages you want Asana to access and click Allow access.
- Paste the URL of the parent page or database
- Click Create Rule
Notion
Here’s how to attach an existing Notion page as a widget to an Asana task:
- Log into Asana, and find the project where you want to enable the Notion widget
- Click on Customize in the upper right-hand corner
- Scroll down to the Apps section, then select +Add app
- Select Notion widget
- Navigate to an Asana task
- Link an existing Notion page to a task by clicking the Add Notion page button under the Notion field at the top of the task details pane
- Insert the URL for your relevant Notion page
- Attached Notion details will appear as a widget in the task pane, including owner, comments, and last modified date
Note: This integration is already built into Asana, but you need to sign up for a Notion account to get started.
The Notion widget is available without a paid Asana subscription.
Mailchimp
The Mailchimp + Asana integration allows teams to monitor important campaign details and reporting metrics from Mailchimp in Asana tasks.
For example, teams who plan email campaigns in Asana can also add a Mailchimp campaign widget to a tracking task to monitor campaign performance. You can also use rules to trigger the addition of campaign metrics as a comment on a linked task, so that task collaborators are notified about the campaign's status.
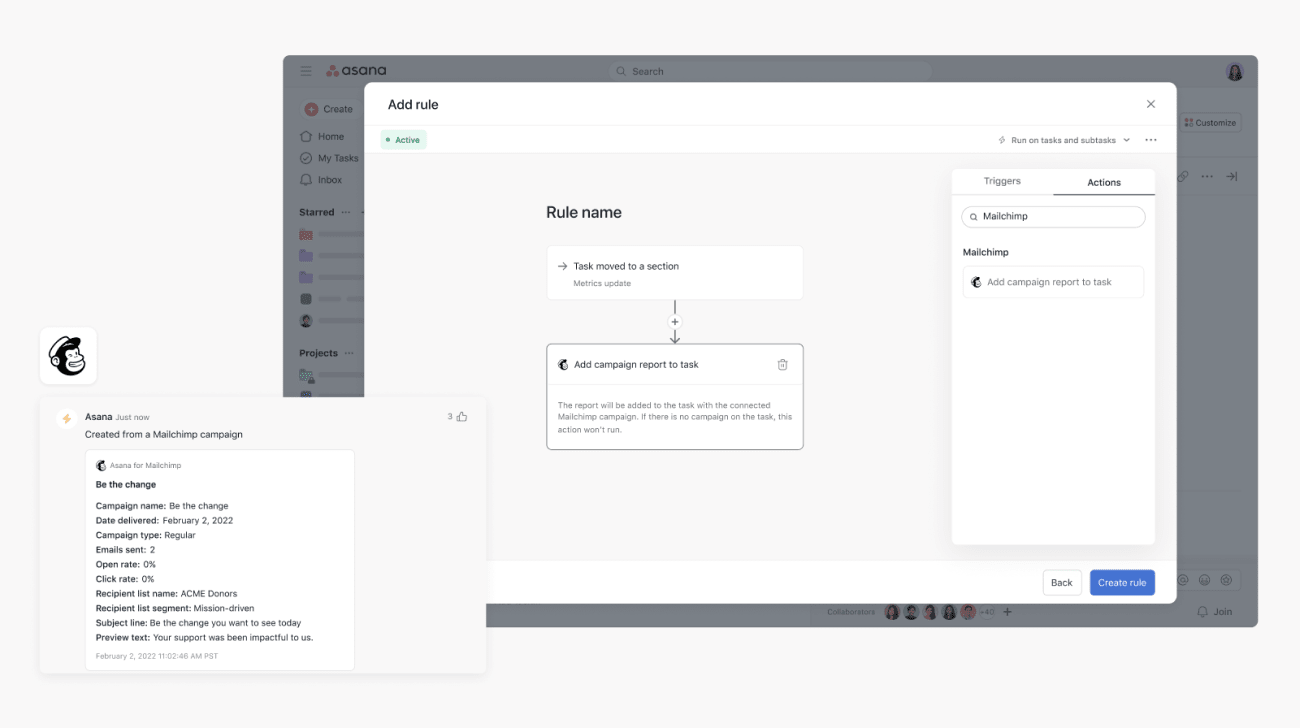
Steps to configure rules integration
- Navigate to the specific Asana project where you’d like to add a rules integration
- Click Customize in the top-right corner, navigate to Rules, and select + Add rule
- Select Mailchimp from the left column
- You can select a preset rule or click Create custom rule
- If creating a custom rule, add a name, and choose a trigger and action to get started
- Log into Asana, and find the project where you want to enable the Mailchimp widget
- Click on Customize in the upper right-hand corner
- Scroll down to the Apps section, then select +Add app
- Select Mailchimp
- Click Add to project and follow the steps to connect Mailchimp to Asana
Here’s how to attach an existing Mailchimp campaign as a widget to an Asana task:
- Log into Asana, and find the project where you want to enable the Mailchimp widget
- Click on Customize in the upper right-hand corner
- Scroll down to the Apps section, then select +Add app
- Select Mailchimp
- Click Add to project and follow the steps to connect Mailchimp to Asana
- Link an existing Mailchimp page to a task by clicking the Add Mailchimp campaign button under the Mailchimp field at the top of the task details pane
- Insert the URL for your relevant Mailchimp page
- Attached Mailchimp details will appear as a widget in the task pane, including owner, comments, and last modified date
Note: This integration is already built into Asana, but you need to sign up for a Mailchimp account to get started.
The Mailchimp widget is available with an Asana Premium, Business, or Enterprise subscription.
Freshdesk
The Freshdesk + Asana integration allows teams to keep track of customer support tickets and their status by connecting apps together. Instead of having to check separate tools for the information needed to resolve customer issues, teams can view accurate Freshdesk ticket details in Asana, while working on related tasks.
For example, teams who have been tracking customer support tickets in Asana can add a Freshdesk ticket to a task, to monitor status, ticket owner, and ticket request date at a glance.
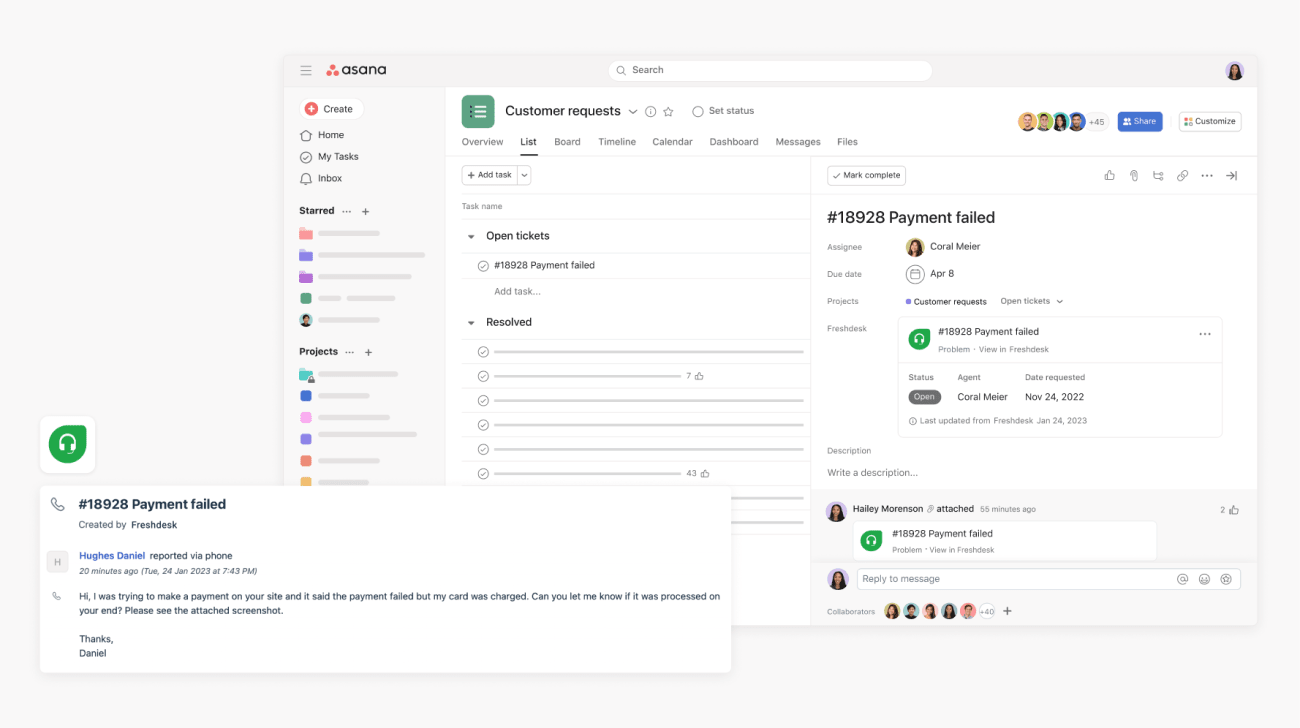
Here’s how to attach a Freshdesk customer support ticket to an Asana task:
- Log into Asana, and find the project where you want to enable the Freshdesk widget
- Click on Customize in the upper right-hand corner
- Scroll down to the Apps section, then select + Add app
- Select Freshdesk
- Click Add to project and follow the steps to connect Freshdesk to Asana
- Navigate to an Asana task in the project
- Link a customer support ticket to a task by clicking the Add Freshdesk ticket button on the Freshdesk field at the top of the task details pane
- Insert the URL for the relevant Freshdesk ticket
- Attached Freshdesk ticket details will appear as a widget in the task pane
Note: This integration is already built into Asana, but you need to sign up for a Freshdesk account to get started.
Intercom
The Intercom + Asana integration allows teams to keep track of Intercom conversations and their statuses in Asana. Instead of having to check separate tools for the information needed to resolve customer issues, teams can view Intercom conversation details directly in Asana.
For example, support teams who have been tracking customer feedback in Asana can add an Intercom conversation to a task to monitor the state, owner, and request dates at a glance.
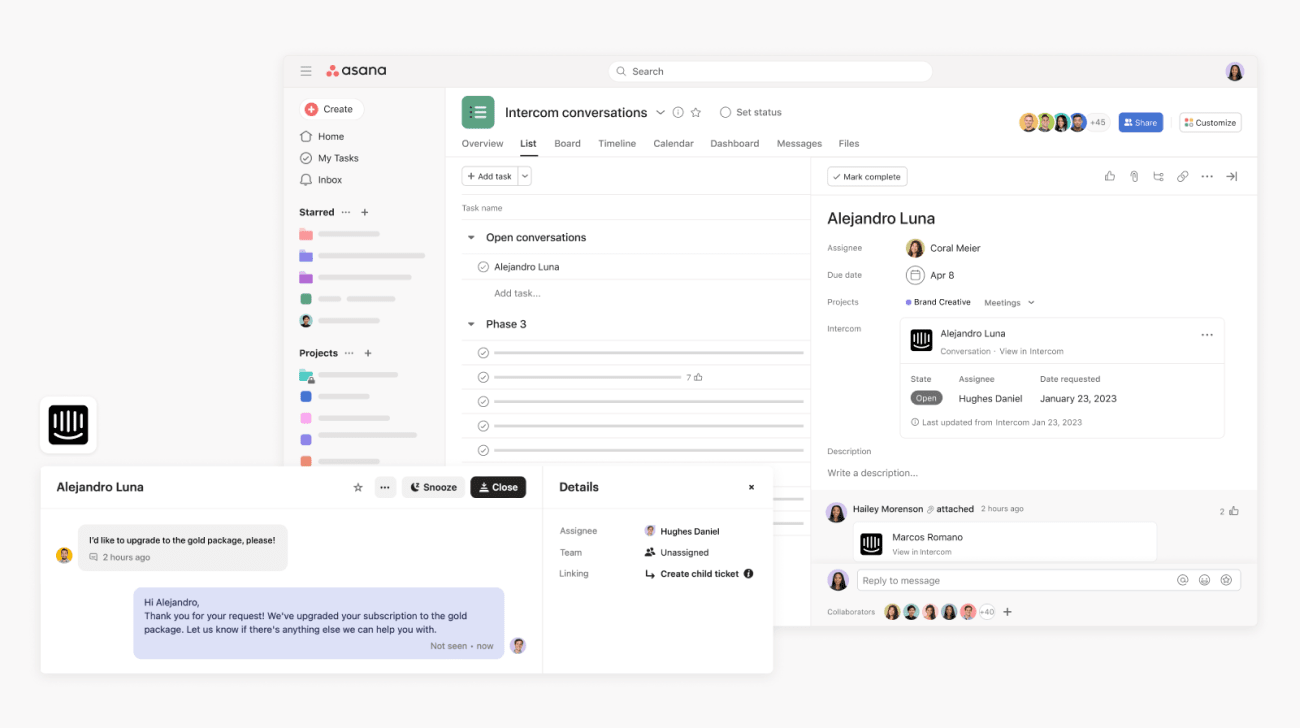
Here’s how to attach an Intercom customer support ticket to an Asana task:
- Log into Asana, and find the project where you want to enable the Intercom widget
- Click on Customize in the upper right-hand corner
- Scroll down to the Apps section, then select + Add app
- Select Intercom
- Click Add to project and follow the steps to connect Intercom to Asana
- Navigate to an Asana task within the project
- Link a customer support ticket to the task by clicking the Add Intercom ticket button on the Intercom field at the top of the task details pane
- Insert the URL for the relevant Intercom ticket
- Attached Intercom ticket details will appear as a widget in the task pane
Note: This integration is already built into Asana, but you need to sign up for an Intercom account to get started.
Bynder
The Bynder + Asana integration allows teams to add Bynder assets to Asana tasks so that collaborators can track related work. Instead of repeatedly copying and pasting links between tools, linking Asana and Bynder drives seamless visibility and collaboration.
For example, teams can collaborate on campaign asset approvals in Asana and, following approval, add the Bynder asset to the Asana task as a widget. This makes it easy for collaborators to see the asset name, last modified date, public or private status, and follow the asset link path, all from one location in Asana.
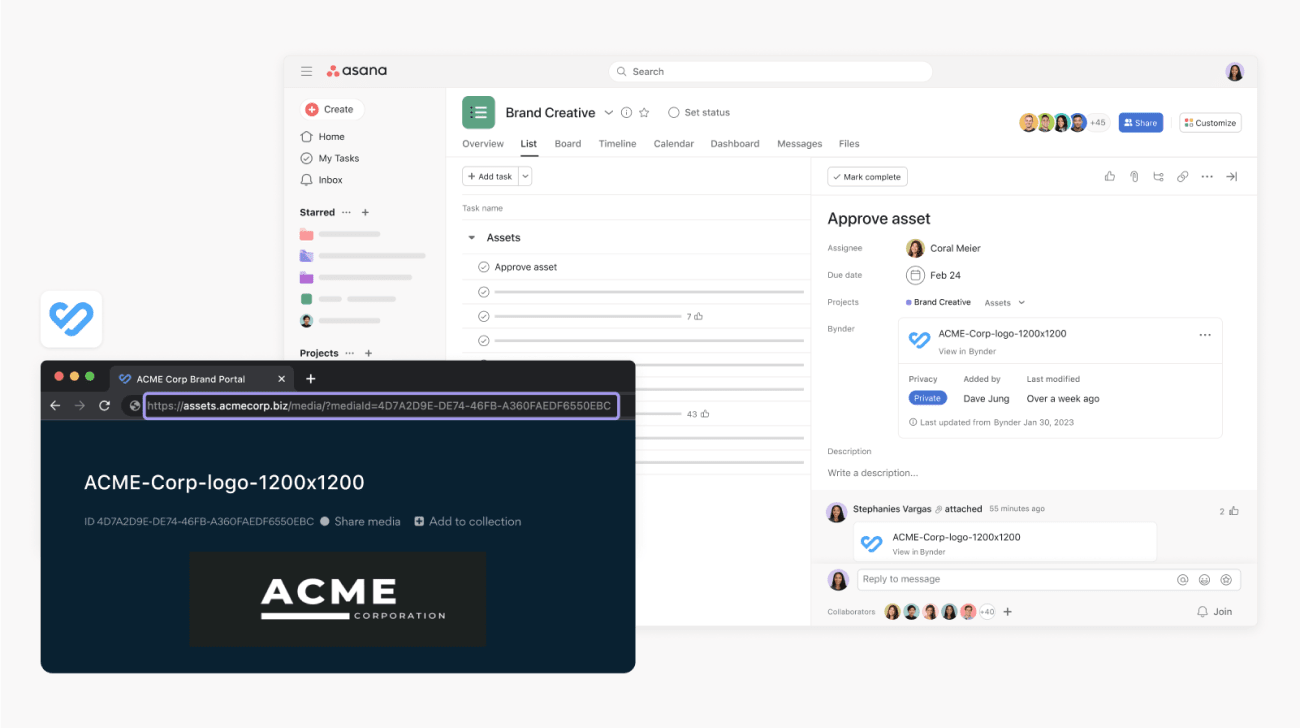
Here’s how to attach a Bynder asset to an Asana task:
- Log into Asana, and find the project where you want to enable the Bynder widget
- Click on Customize in the upper right-hand corner
- Scroll down to the Apps section, then select + Add app
- Select Bynder
- Click Add to project and follow the steps to connect Bynder to Asana
- Navigate to an Asana task in the project
- Link a digital asset to the task by clicking the Add Bynder asset button on the Bynder field at the top of the task details pane
- Insert the URL for the relevant Bynder asset
- Attached Bynder asset details will appear as a widget in the task pane
Note: This integration is already built into Asana, but you need to sign up for a Bynder account to get started.
DocuSign
The DocuSign + Asana integration allows teams to keep track of DocuSign envelopes by adding them to Asana tasks. Instead of having to check separate tools to see the status of an envelope, teams can view accurate envelope details in Asana.
For example, teams using Asana for their contract approval process can add a DocuSign envelope to an Asana task to monitor status, sender, recipients, and date delivered.
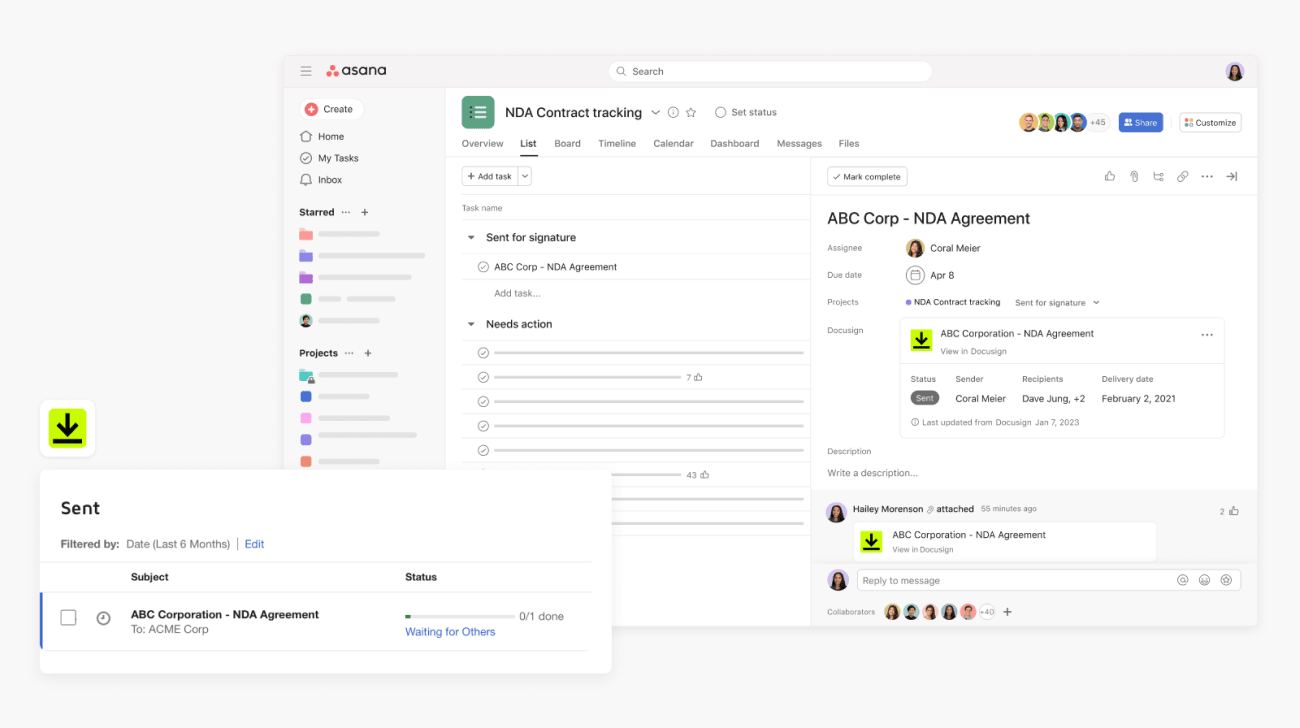
Here’s how to attach a DocuSign envelope to an Asana task:
- Log into Asana, and find the project where you want to enable the DocuSign widget
- Click on Customize in the upper right-hand corner
- Scroll down to the Apps section, then select + Add app
- Select DocuSign
- Click Add to project and follow the steps to connect DocuSign to Asana
- Navigate to an Asana task
- Link an envelope to a task by clicking the Add DocuSign envelope button on the DocuSign field at the top of the task details pane
- Insert the URL for your relevant DocuSign envelope
- Attached DocuSign envelope details will appear as a widget in the task pane
Note: This integration is already built into Asana, but you need to sign up for a DocuSign account to get started.
Confluence
Teams can streamline work with Confluence + Asana by automatically creating Confluence pages in Asana and adding Confluence pages to Asana tasks. Rather than manually creating Confluence pages and linking those to relevant Asana tasks, teams can use Asana Rules to streamline how task collaborators work together in the same document.
For example, teams that are conducting research interviews in Asana tasks can automatically create a Confluence page to take notes when the task moves to the "Interview scheduled" section. Teams can also link existing Confluence pages to an Asana task so that collaborators can see relevant context from the page.
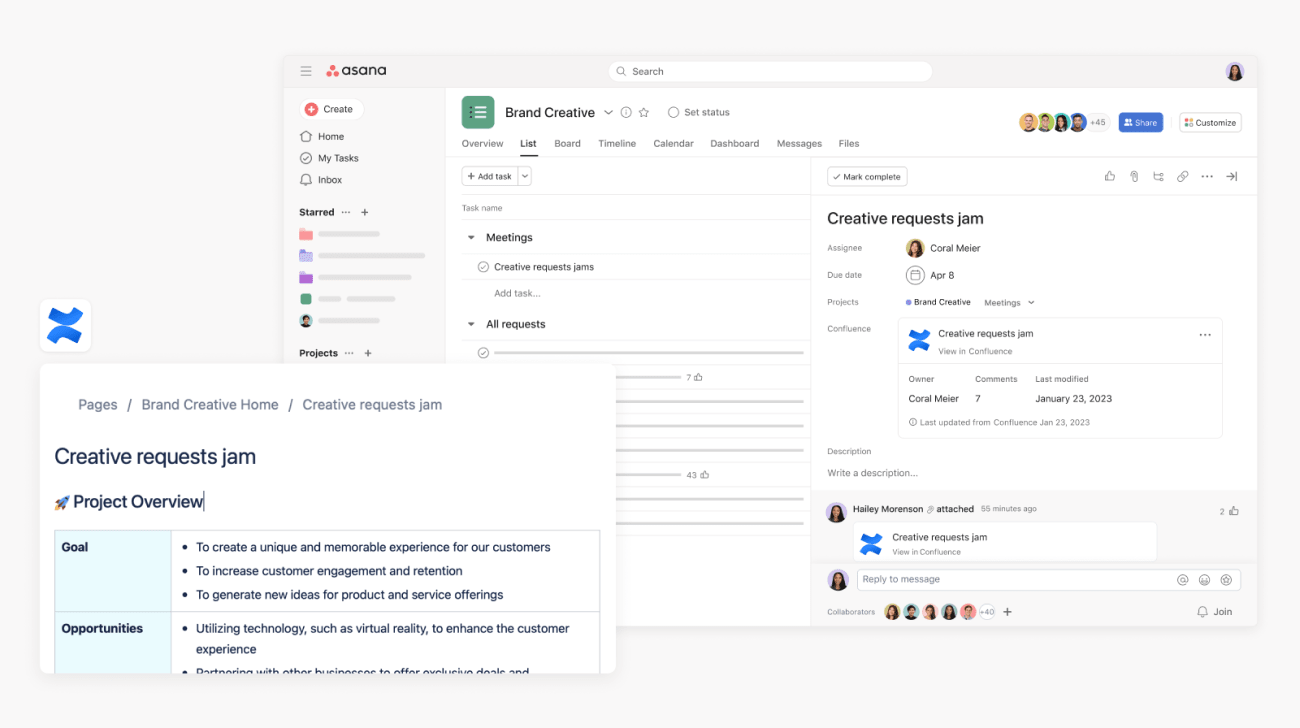
Here’s how to attach a Confluence page to an Asana task:
- Log into Asana, and find the project where you want to enable the Confluence widget
- Click on Customize in the upper right-hand corner
- Scroll down to the Apps section, then select + Add app
- Select Confluence
- Click Add to project and follow the steps to connect Confluence to Asana
- Navigate to an Asana task within the project
- Link a Confluence page by clicking the Add Confluence page button on the Confluence field at the top of the task details pane
- Insert the URL for the relevant Confluence page
- The attached Confluence page details will appear as a widget in the task pane
Note: This integration is already built into Asana, but you need to sign up for an Confluence account to get started.
Here’s how to set up the Asana Rules integration with Confluence:
- Navigate to the specific Asana project where you’d like to add a rules integration
- Click Customize in the top-right corner, navigate to Rules, and select + Add rule
- Select Confluence
- You can select a preset rule, or click Create custom rule
- If creating a custom rule, add a name, and choose a trigger and action to get started
- Authenticate by clicking Connect to Confluence, and following the steps
- Add the Confluence space URL

