Company Type
Topics
In this article, you'll learn about Asana's data management practices, security features that enhance account protection, and data export functionalities.
Login detection emails
An email will go out to Asana users when we notice a new login to their account.
This email will go out to users when they use a browser and IP address combination for the very first time
Note
This will apply to logins with username/password and Google SAML/SSO authentication.
Data replication, backup and recovery
Asana uses Amazon's relational database service (RDS) to manage all user data. The database is replicated synchronously so that we can typically recover from a database failure in a matter of seconds.
As an extra precaution, we take regular snapshots of the database and securely move them to a separate data center so that we can restore them elsewhere as needed even in the event of a regional Amazon failure.
Learn more about Amazon's relational database service here.
Export project data
You can export your own data, per project to the text-based file formats JSON or CSV, the latter of which can be viewed in a spreadsheet application like Microsoft Excel or Google Sheets.
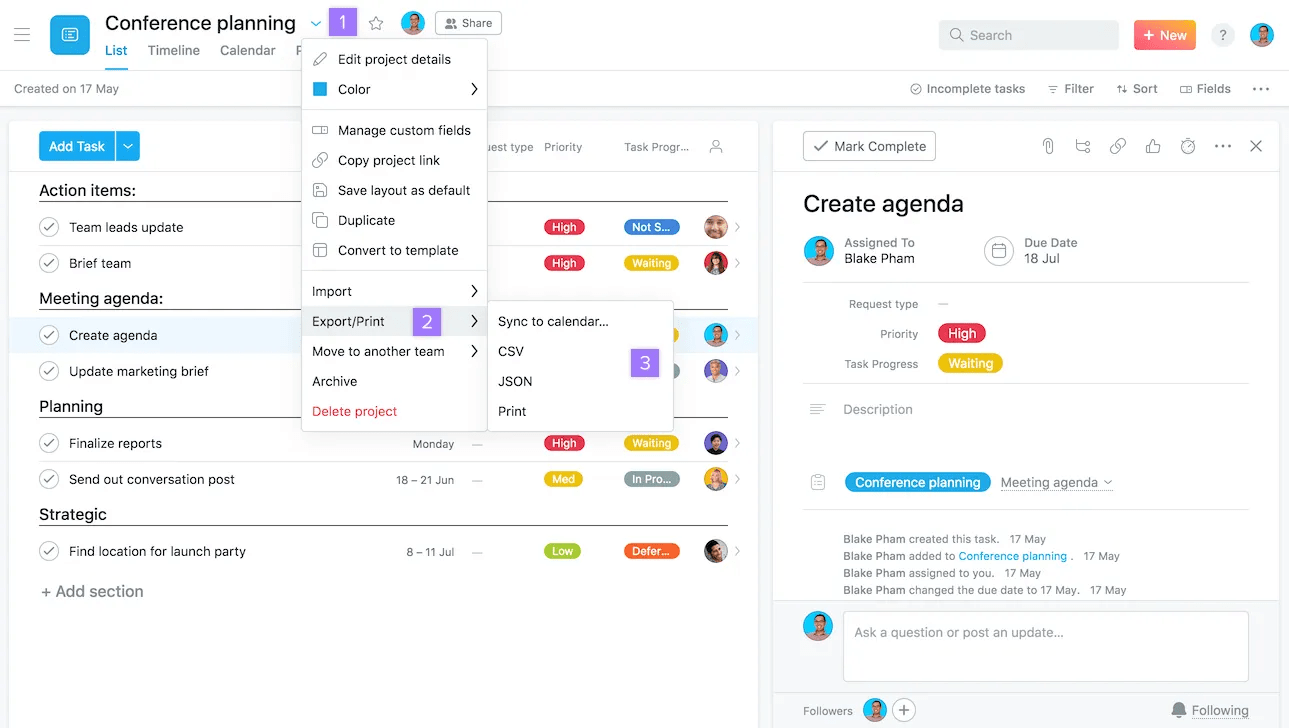
To export:
- Click the drop down arrow from the header
- Select Export/Print
- Select either JSON or CSV
Note
Aside from projects, you can also export a saved search or your My tasks.
JSON
If you choose the JSON option, a link to the JSON file will open in a new tab. The URL is a permalink, is provided as https, and is subject to access control. Only people who can view the content in Asana will be able to load the content in the JSON URL, and only when they are logged in to Asana.
JSON can be converted into other formats - ask your IT contact or search online to learn more (we do not offer any conversion instructions).
CSV
If you choose the CSV option, the CSV file will download to your computer from your browser. When dealing with large projects, the CSV file isn't immediately downloaded to the computer. Instead, a message is displayed indicating that "Your CSV is being generated. You will get an email when it is finished." Once the CSV is ready, an email is sent to the user, which includes a URL for accessing the file.
Export team CSV
Admins and super admins of a paid organization or division can export teams to CSV through the Teams tab of their admin console.
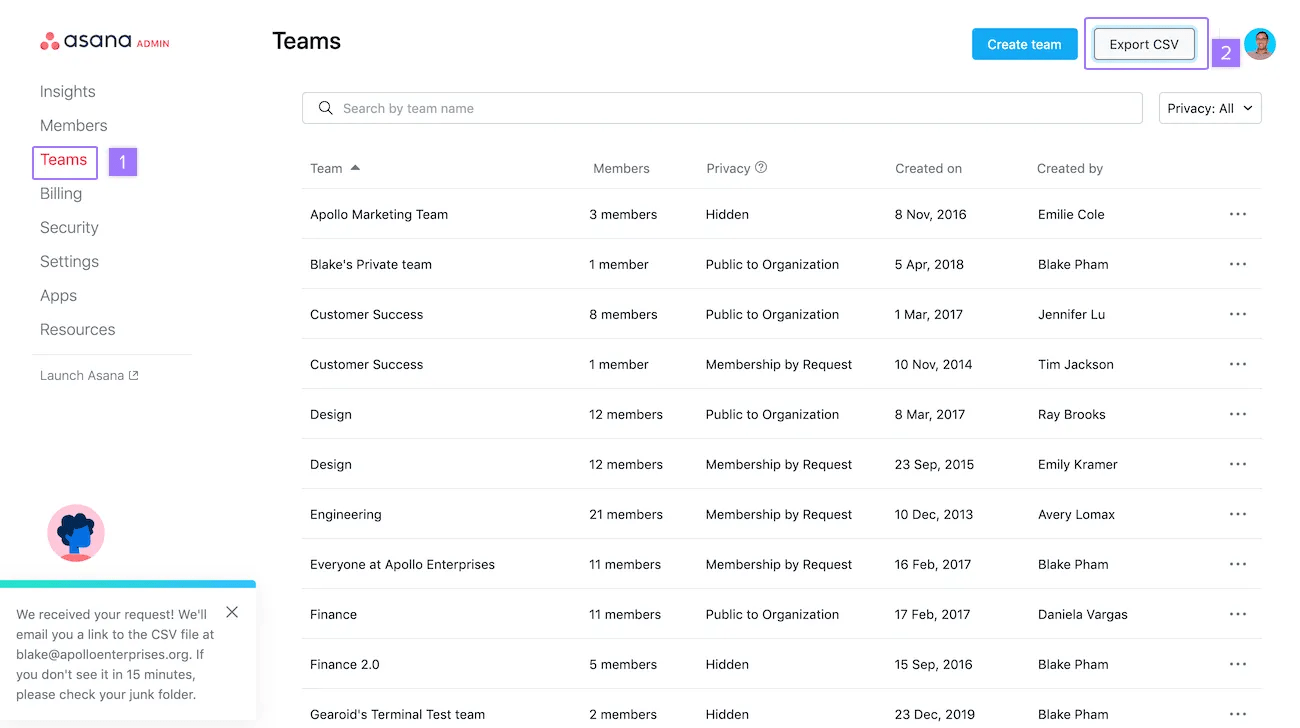
From your admin console:
- Navigate to Teams tab
- Click Export CSV
You will then receive an email message with the link to download.
Download your teams list so that you have a better understanding of different teams in your domain and also the list of members in each team along with member details.
The CSV file downloaded has the following fields:
- Team
- Member count
- Privacy
- Created on
- Created by
- Description
- Member (email)
- Limited access member (email)
- Pending invite (email)
Full export of an organization
Available on the Asana Enterprise+ tier, as well as legacy tier Legacy Enterprise.
This option allows the admin or super admin of an organization to export all projects, tasks, and messages in an entire organization via the organization settings or the Asana API.
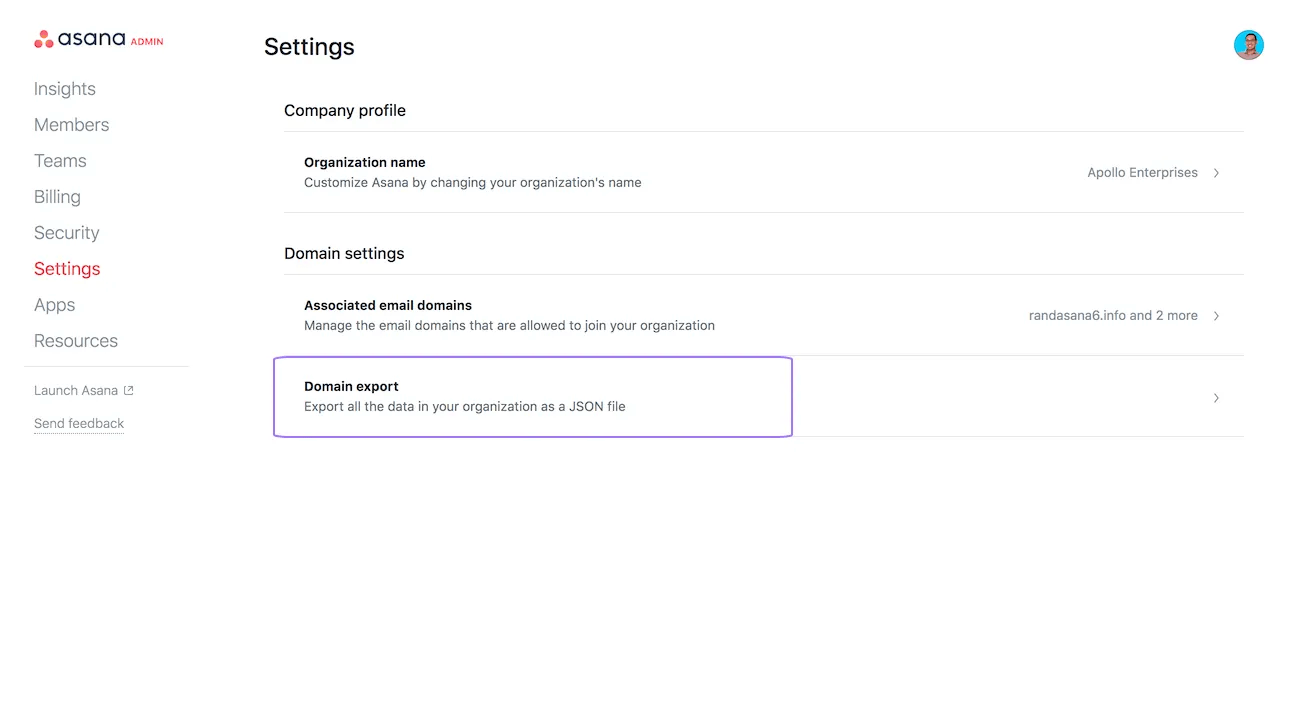
To request a full export of your organization:
- Click your profile photo from the top bar and select Admin console
- Navigate to the Settings tab
- Select Domain export
Note
A full export of an organization will contain all deleted projects and teams as well as all tasks that deleted within the past 30 days prior to submitting the request.
Once the export is complete, the admin will be sent a link to download the data. The exported data will be in the form of a JSON file only. It is not possible to receive the exported data in the form of a CSV file.
The JSON file will contain all of the following:
- tasks (including name and ID)
- created_at
- modified_at
- task description
- completed status (true/false)
- assignee_status (later, upcoming, today, inbox)
- completed_at
- due_on
- workspace/team (including name and ID)
- num_likes
- assignee
- likes
- tags
- collaborators (including name and ID)
- projects (including name and ID)
- custom fields
- sections: same information as tasks
- column names (boards)
- attachments (includes images, PDFs and video files)
- comments
- subtasks
- project due date
- project owner
- project statuses
- messages
- task templates
- project templates
Export your organization data using the Asana API
Use Service Accounts to back up your data and automate full organization exports through the Asana API. This allows you to:
- Audit the entire contents of your organization on a regular basis
- Store occasional backups of your Asana data on your own systems
Data privacy and application security
Automated checks
Asana always uses an SSL connection.
All data access in Asana is subject to checks to ensure that nobody from outside your company ever sees or modifies your data.
Asana follows best practices in all areas of application security and prevents common web attack vectors.
Members and guests
Any full member of your workspace or organization can access data that is not marked as private by other members. Learn more about task permissions.
Guests can access data in projects and tasks to which they have been explicitly added to. Learn more about members and guests.
The Asana team
Asana team members are bound by confidentiality agreements, but may access your data to the extent necessary to diagnose and correct problems in the product. Learn more by reading our Privacy Statement.
Physical and network security
All of Asana’s servers are hosted in secure, SOC 2 audited data centers. All servers are firewalled to permit the minimum traffic necessary to run the service, and access to those servers is limited to Asana employees with a legitimate business need.
Note
We do not offer a version of Asana that you can run on your own servers (on premise).
Additional information
Like what you see? Get started with a free Asana trial today. Try for free
Related articles
- No related articles found.