Company Type
Topics
Asana for Jira Cloud
In This Article
- Installation process and requirements
- Jira Cloud data sync
- Supported issue types and fields
- Setting up Jira data sync for your workflows
- Keeping an Asana project and a Jira project in sync
- Jira Cloud comment sync
- Import existing issues
- Sprint field for field mapping
- Sync for existing tasks
- Permissions and privacy
- Use synced Jira data for automation and project-level reporting
- FAQ
The Asana for Jira Cloud integration is available on Asana Starter, Advanced, Enterprise, and Enterprise+ tiers, as well as legacy tiers Premium, Business, and Legacy Enterprise.
Jira Cloud two-way sync functionality is available on Asana Advanced, Enterprise, and Enterprise+ tiers, as well as legacy tiers Business and Legacy Enterprise.
Visit our pricing page for more information.
Install the Asana for Jira Cloud integration to create transparency between business and technical teams and build interactive, connected workflows.
The Asana for Jira Cloud integration allows business and product teams that plan work in Asana to collaborate and work seamlessly with engineering and technical teams who execute work in Jira.
Drive visibility and transparency across Asana and Jira Cloud
- Instead of wasting time with status update meetings and manually updating two different tools, simply connect Asana and Jira to create transparency between business and technical teams.
- Increase visibility into the product development process and reduce unnecessary time wasted on back and forth communication.
- Create interactive, connected workflows between both teams.
Connect technical and business teams
- Coordinate work across teams to ensure a transparent workflow.
- Ensure a seamless tracking system that works cross-functionally.
Installation process and requirements
To set up the Jira Cloud app in Asana:
- You must have a Jira Cloud account to install the Jira Cloud integration.
- When setting up a Jira project with an Asana project, you need to have edit access to the Jira project to set this up.
How does the authorization model work?
- The integration uses OAuth as the authorization standard. Users will remain authenticated until the OAuth token expires or until someone revokes that token.
- To link existing Jira issues to an Asana task or to create a new Jira issue from Asana, you need to authorize a Jira account.
Note: If your organization uses Jira Data Center, please use the Asana for Jira Data Center integration. Don’t know if your organization uses Jira Cloud or Jira Data Center? Take a look at this Atlassian Community page to find out.
Installing Jira Cloud
Navigate to a project where you would like to install the Asana for Jira Cloud integration.
- Click Customize
- Navigate to Apps, click +Add App, and select Jira Cloud
- Click Add to project
- Authorize your Jira account
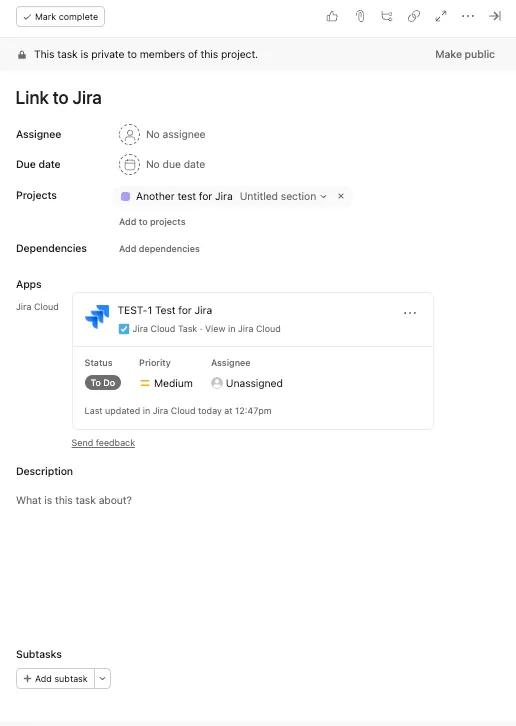
From a task in Asana, users can create a new Jira Issue directly in Asana or easily link to an existing Jira issue. We support all Jira Software issue types, including Bug, Epic, Subtask, Story, and Task.
Jira Cloud data sync
Jira Cloud two-way sync functionality is available on Asana Advanced, Enterprise, and Enterprise+ tiers, as well as legacy tiers Business and Legacy Enterprise.
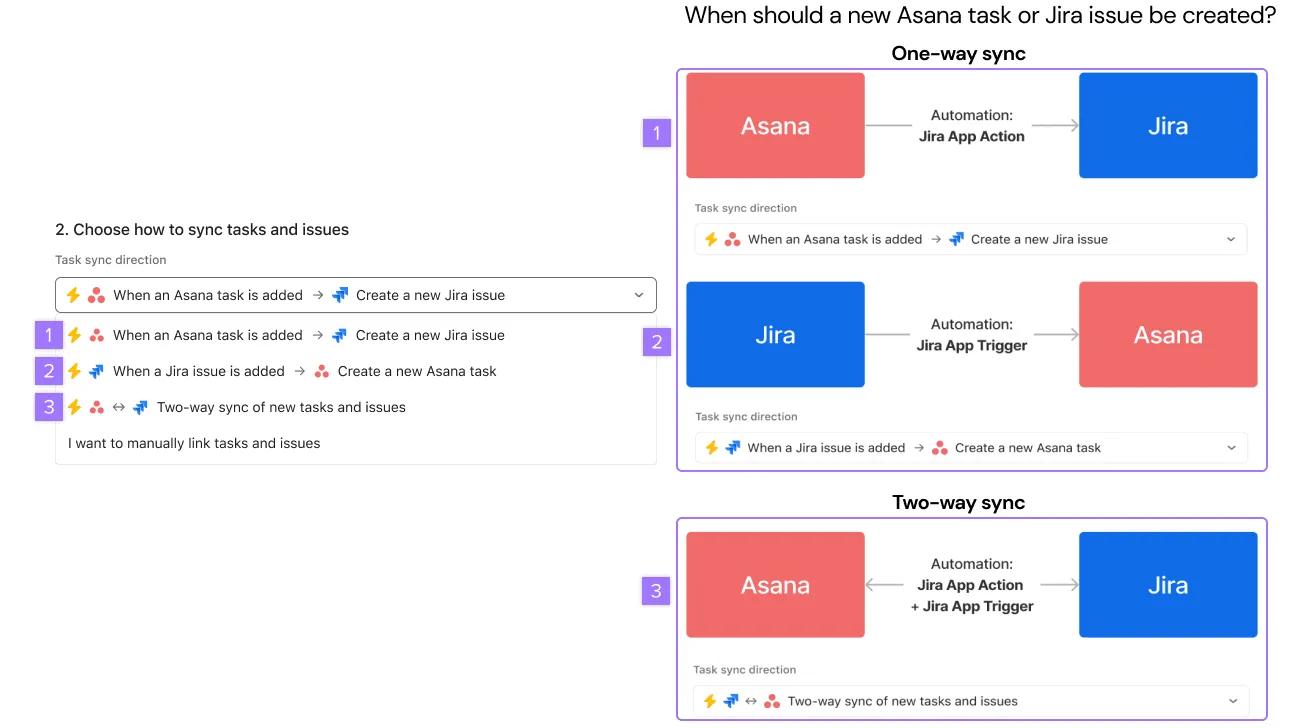
What does “two-way sync” mean?
A two-way sync refers to automatic updates between designated fields in Asana and Jira. This is achieved by the ability to automatically create and update a task or issue from Asana →Jira, Jira→Asana, or Asana←→Jira on a project basis.
Choosing a one-way or two-way task sync direction
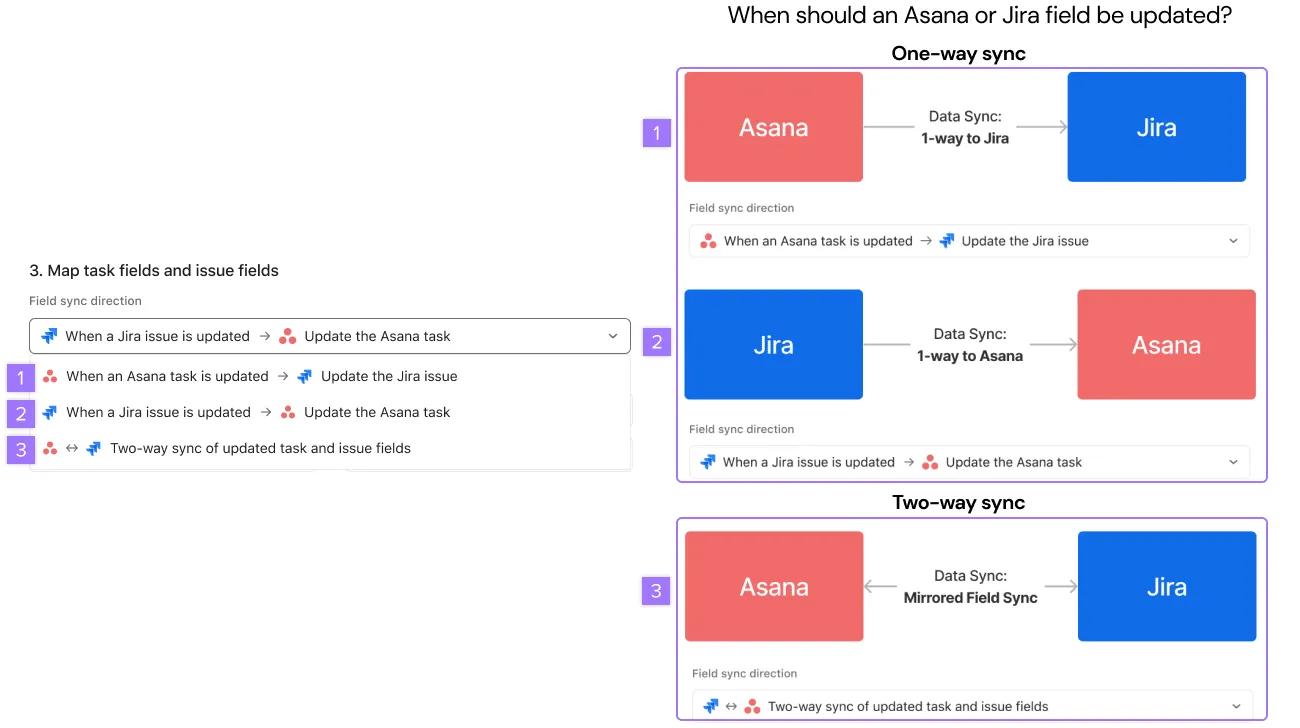
Choosing a one-way or two-way field sync direction
Supported issue types and fields
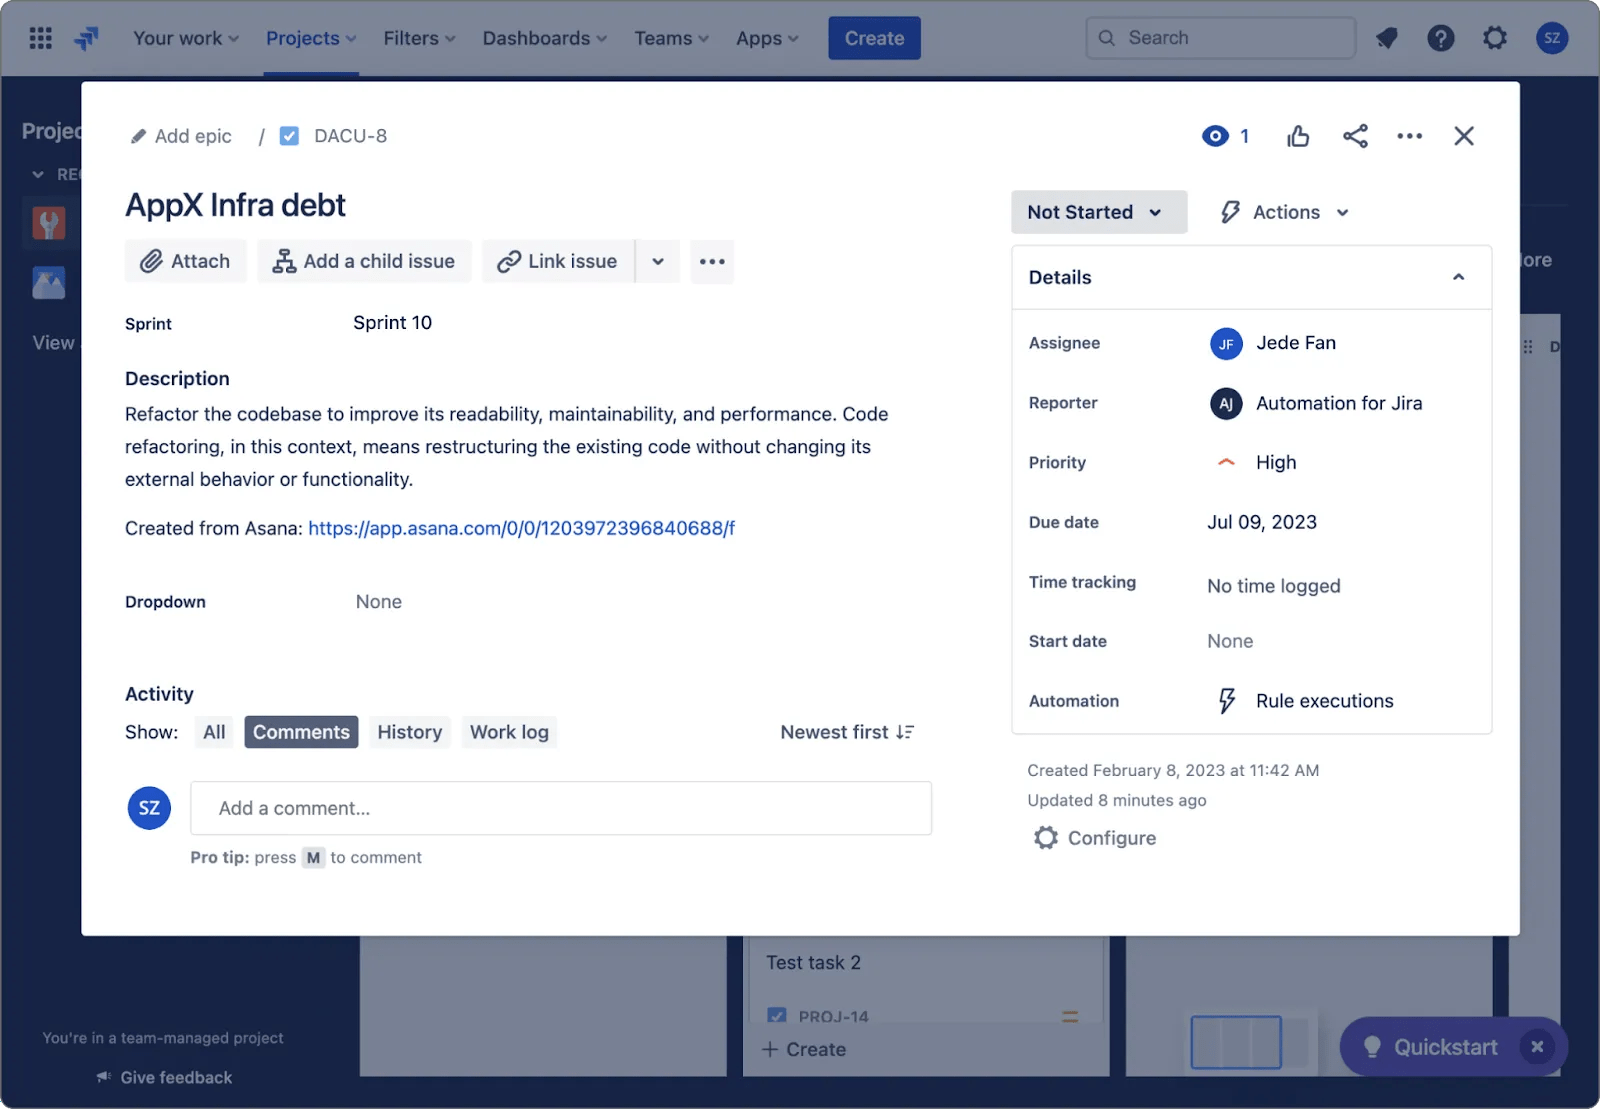
Each Asana project is mapped to sync with a particular Jira Issue type from a Jira project. Asana’s Jira Cloud integration supports standard issue types (e.g., Epic, Story) and custom issue types. Synced fields appear in both list and board views.
| Asana | Jira |
|---|---|
| Task name | Summary |
| Description | Description |
| Status app custom field | Status |
| Priority app custom field | Priority |
| Assignee app custom field | Assignee |
| Due date | Due date |
| Fix version custom field | Fix version |
| Other Asana custom field types: Date, People, Number, Single-select, Multi-select | Other Jira custom field types: Date, Number, Dropdown, Checkbox, Short text, Long text |
| Jira sprint custom field | Sprint |
Note: We don’t support Timestamp or Dependent drop-down field types in either sync direction. URL, Sprint, Story point estimate fields, and field types are available for Jira → Asana sync only
Setting up Jira data sync for your workflows
Kicking off work from a Jira Project
If you want to kick off work from a Jira Project and keep ongoing data in sync, choose the following settings.
- When choosing how to sync tasks and issues, select When a Jira issue is added → Create a new Asana task
- To create a two-way sync, select When an Asana task is updated → Update the Jira issue
Kicking off work from Asana
If you want to kick off work from an Asana project and keep ongoing data in sync, choose the following settings.
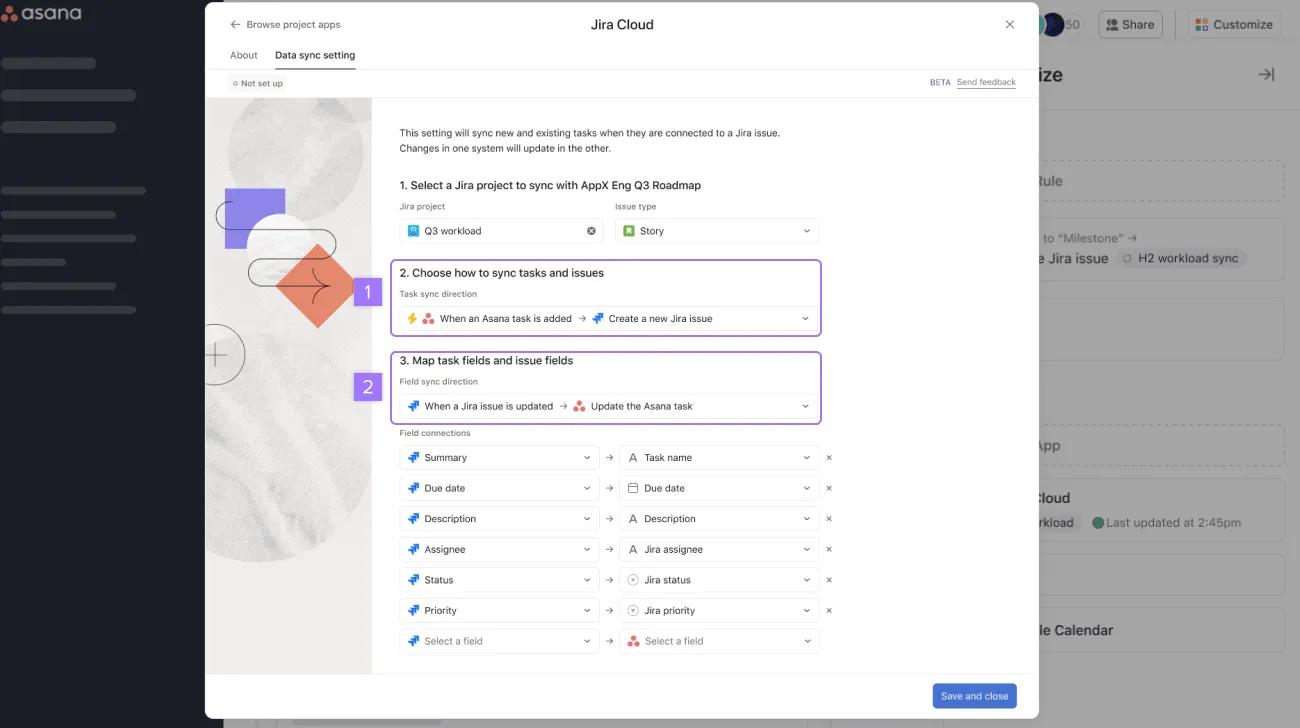
- When choosing how to sync tasks and issues, select When an Asana task is added → Create a new Jira issue
- To create a two-way sync, select When a Jira issue is updated → Update the Asana task
Keeping an Asana project and a Jira project in sync
If you want to mirror an Asana project and a Jira project, choose the following settings.
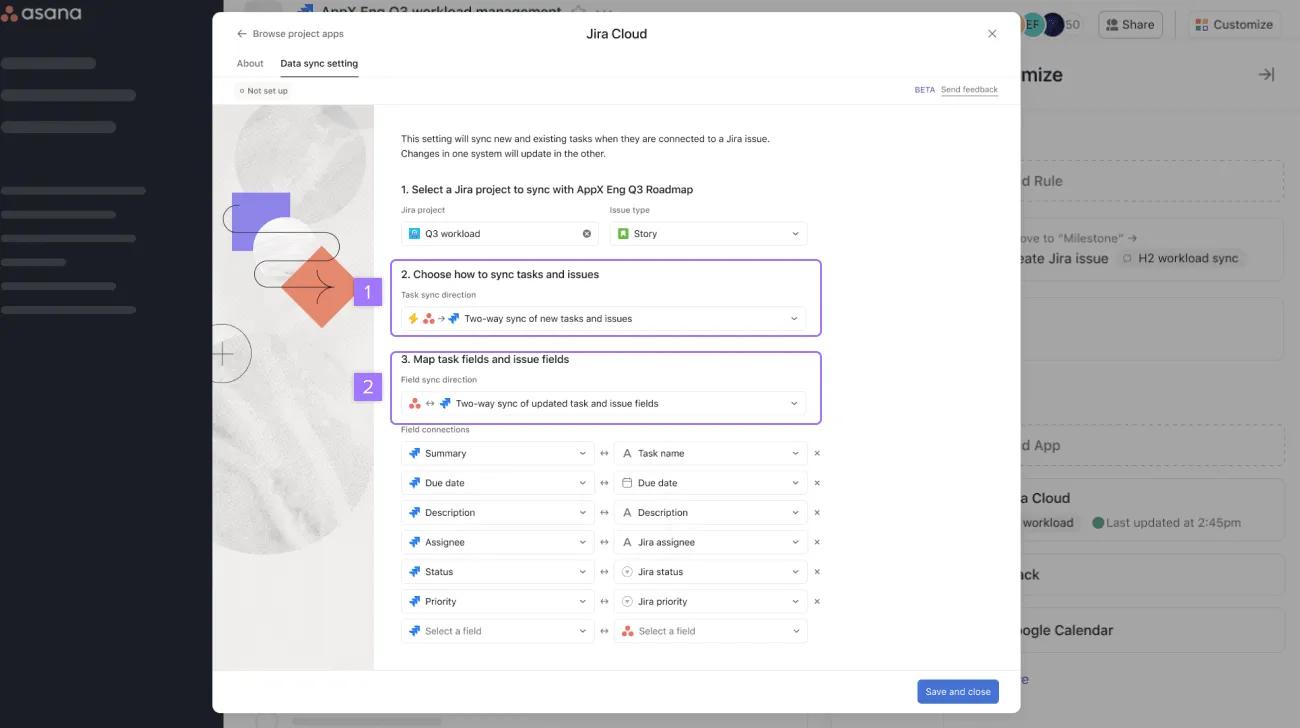
- When choosing how to sync tasks and issues, select Asana → Jira Two-way sync of new tasks and issues
- In Field sync direction, choose Asana ←→Jira Two-way sync of updated task and issue fields
Jira Cloud comment sync
Comment syncing
Comment syncing allows users to stay in their preferred tool (whether that’s Jira or Asana) and collaborate cross-functionally without friction. Users in Jira and Asana can leave comments on tasks or issues in a linked project, and have that comment automatically reflected in the other tool.
Enabling comment sync
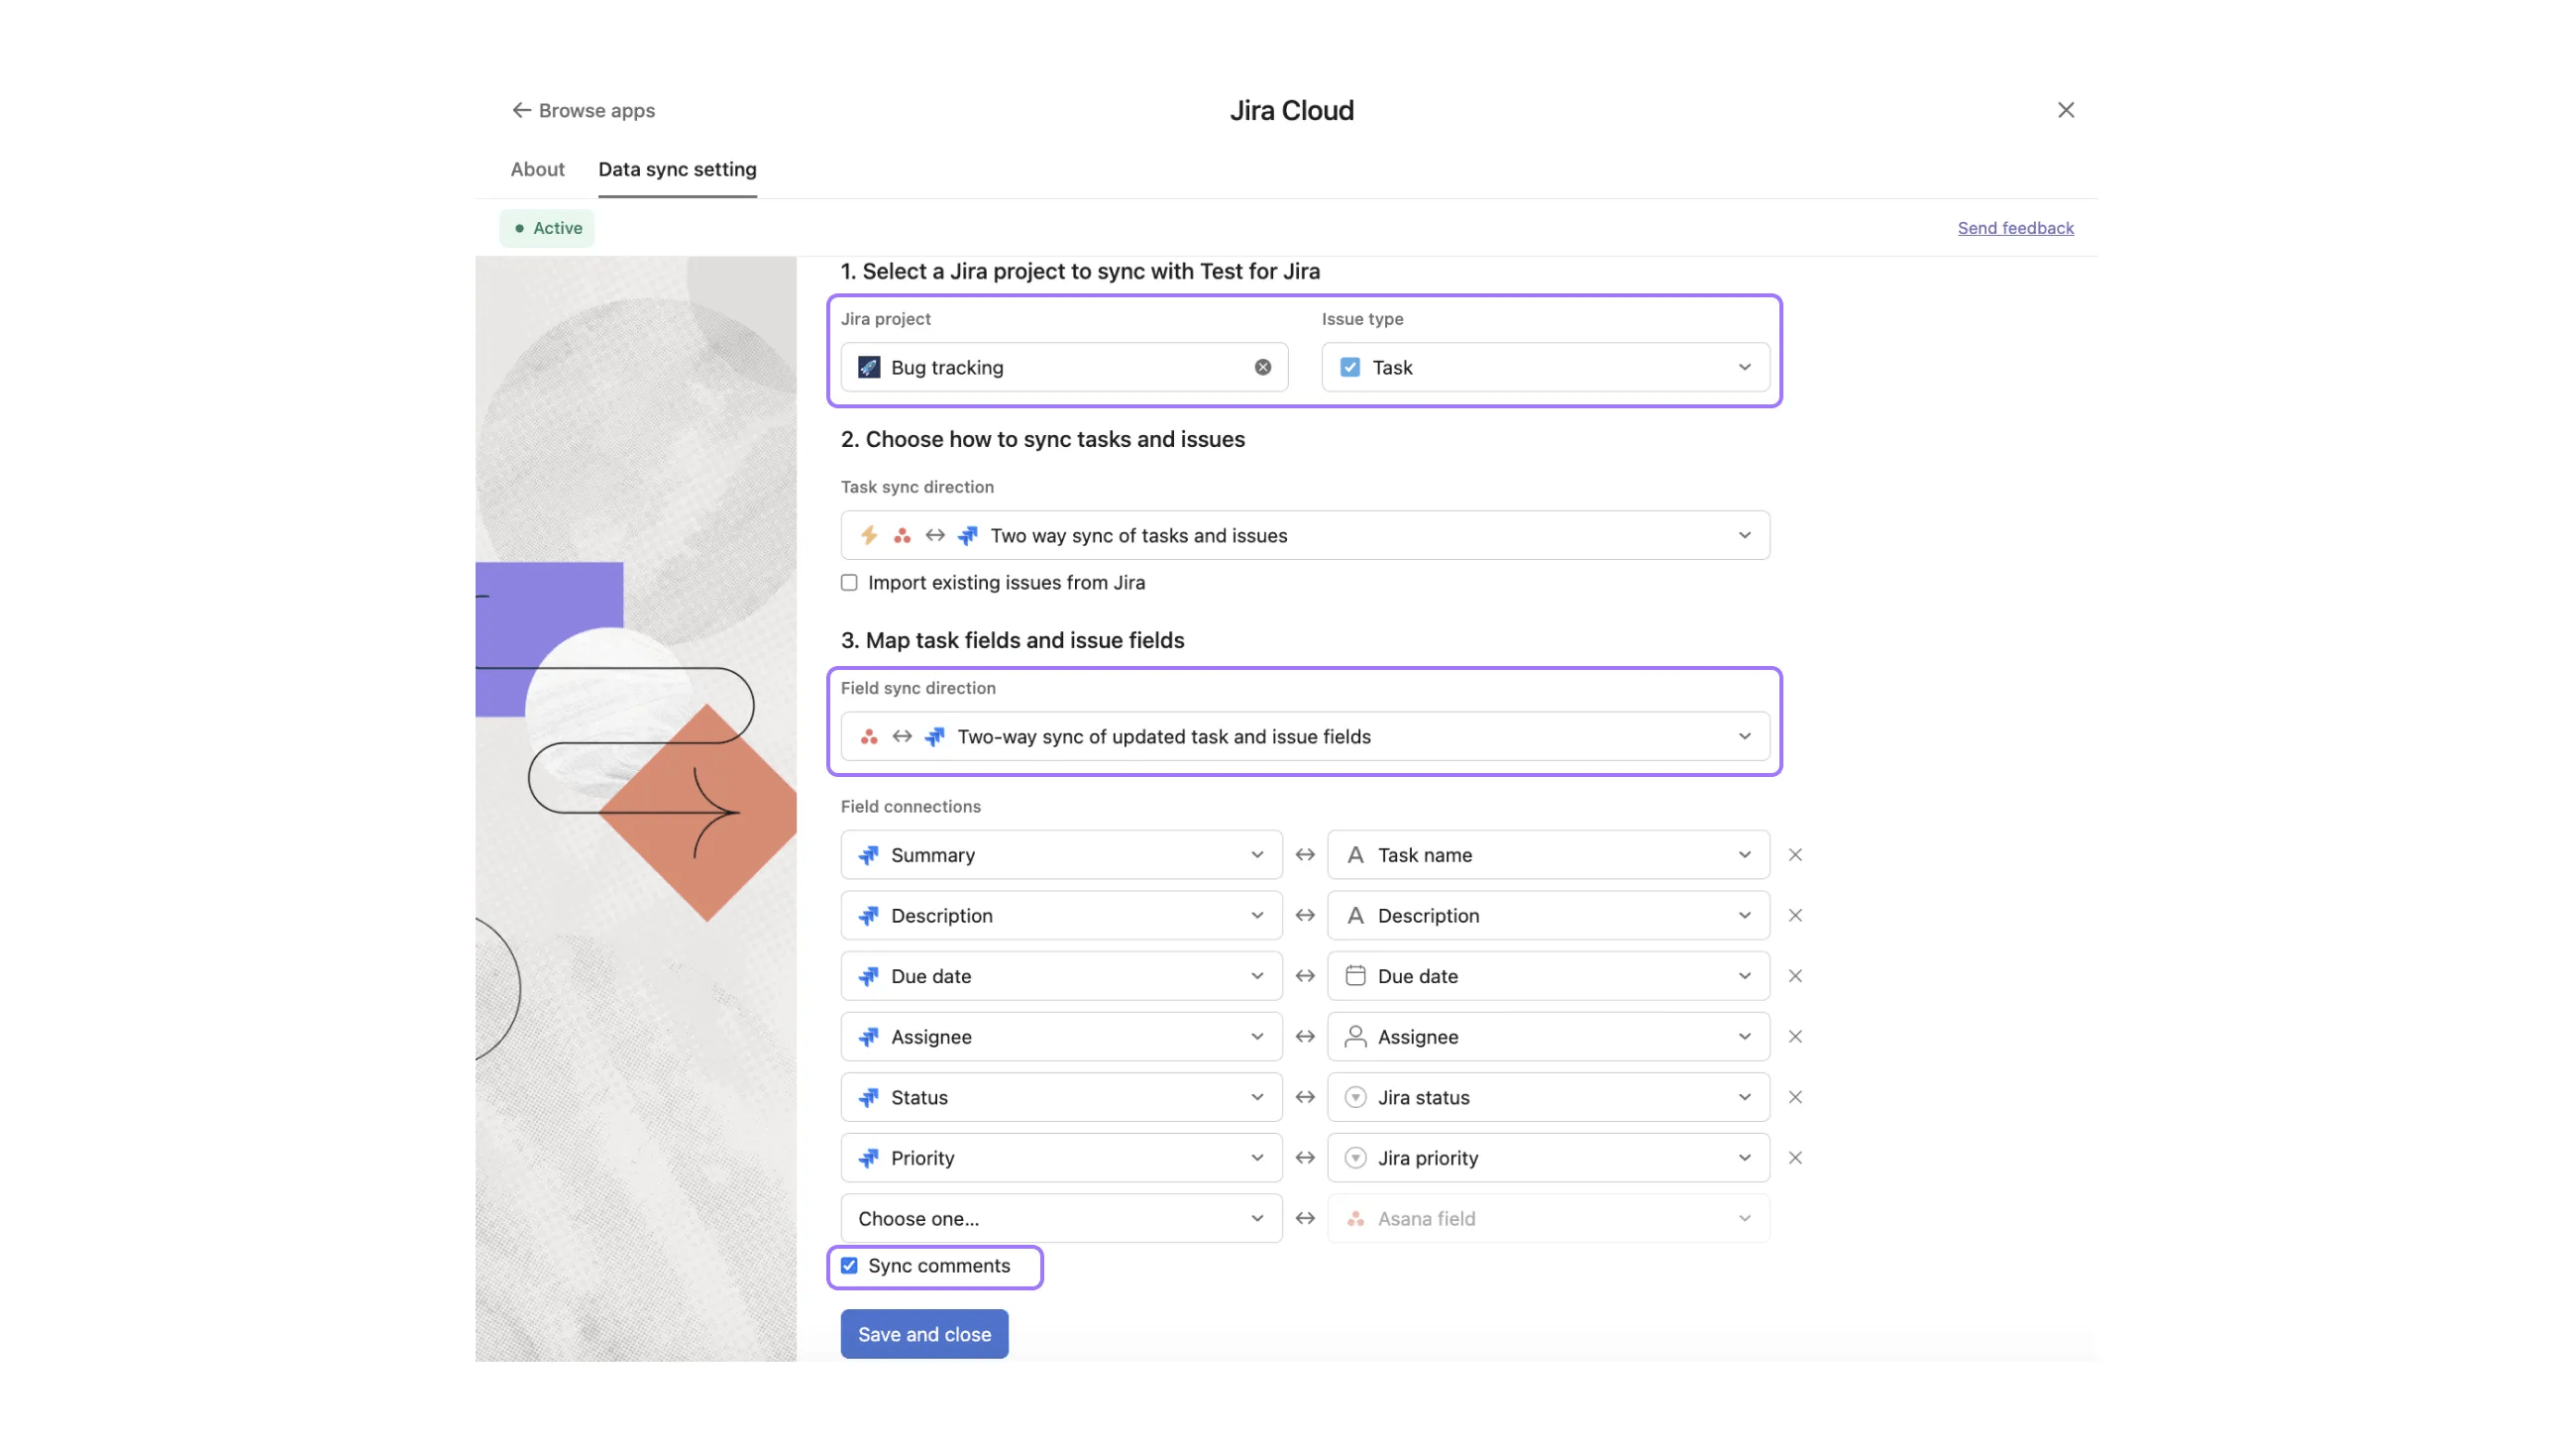
- Open any Asana project and click Customize
- From the customize menu, choose Apps > Jira Cloud
- Activate the Jira Cloud app in the project by logging into your Atlassian account
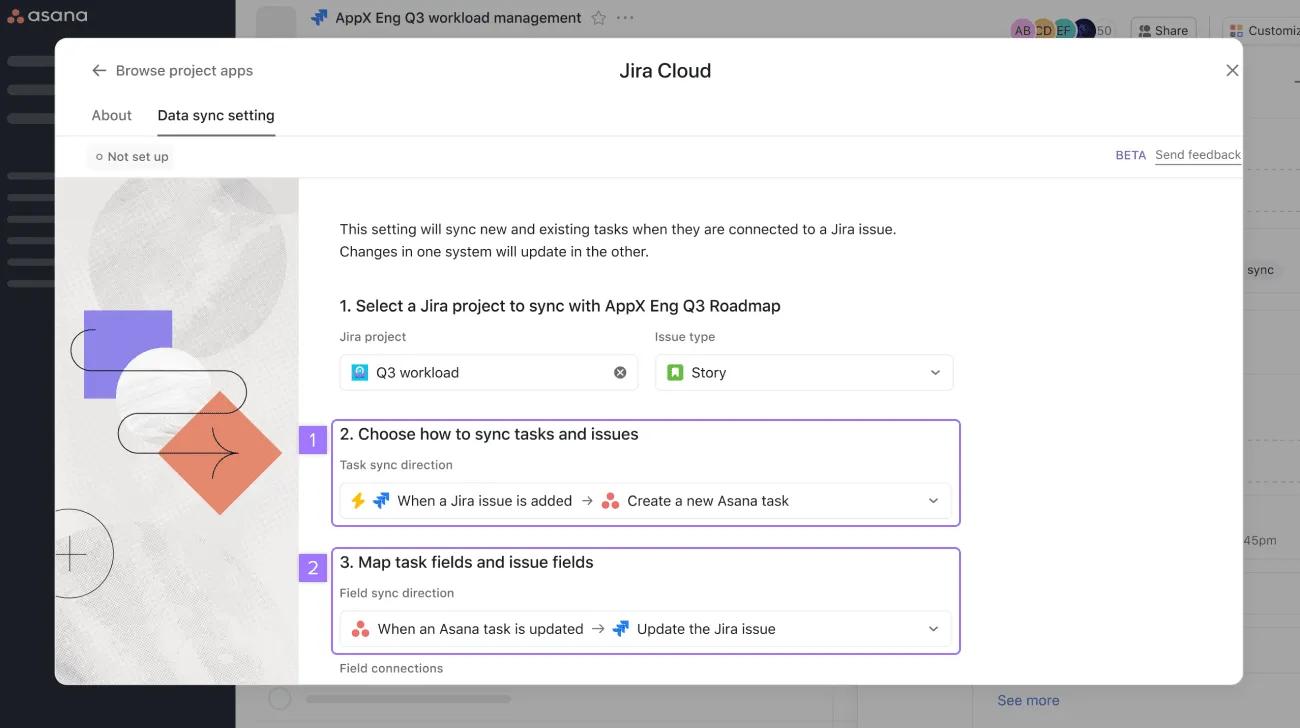
- On the Jira Cloud app page, open the Data sync setting tab
- Select a Jira project and issue type
- Choose the task and field sync directions
- Select the Sync comments checkbox and click Save and close
Using comment sync
Comment sync will occur for any Asana task connected to a Jira issue in the linked project.
- Create a new task in Asana. If the project is set to sync tasks from Asana to Jira, a new corresponding Jira issue will be created automatically.
- Jira → Asana comment sync
- Comment on Jira issue created above
- The comment will appear on the Asana task, authored by the Jira integration
- Asana → Jira comment sync
- Comment on Asana task created above
- The comment will appear on the Jira Issue
Use case examples
Use case 1: Sprint planning with cross-functional teams
- Engineers currently work in Jira and do not have Asana licenses.
- A project manager is coordinating sprint planning across teams in Asana.
- The project manager can set sprint priorities while staying in Asana, while the engineers can ask questions and provide status updates without leaving Jira.
Use case 2:
- Engineers currently work in Jira and do not have Asana licenses.
- A marketer is working on a product launch in Asana.
- The marketer can follow development progress while staying in Asana, and the engineers can track against launch deadlines without leaving Jira.
Import existing issues
You can import existing Jira issues as Asana tasks and apply the data sync setting to these tasks, allowing you to more accurately reflect how an Asana project is tracking a Jira project with all relevant issues captured as Asana tasks.
Use cases examples
When creating an Asana project that should sync with an existing Jira project, import existing Jira issues as well as new issues to sync going forward.
Using issue import
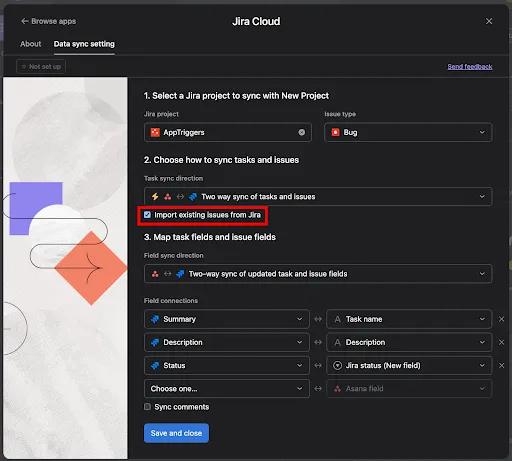
- Open a new Asana project and click the Customize button.
- Select Apps and then the Jira Cloud App.
- Activate the Jira Cloud App in the project by logging into your Atlassian account.
- On the Jira Cloud App page, open the Data sync settings tab.
- Select a Jira project and issue type
- In section 2, check the Import existing issue from Jira checkbox
- Save the data sync configuration by clicking Save and close
Important notes
- Issues that match the Jira project and issue type are imported as new tasks with Jira widgets. They will perform an initial sync for all synced fields:
- Imports are not instantaneous so may take a few minutes.
- The number of issues imported is limited to 150. Once this limit is exceeded, the 150 newest issues will be shown. Please contact our support team if you encounter issues with this limit.
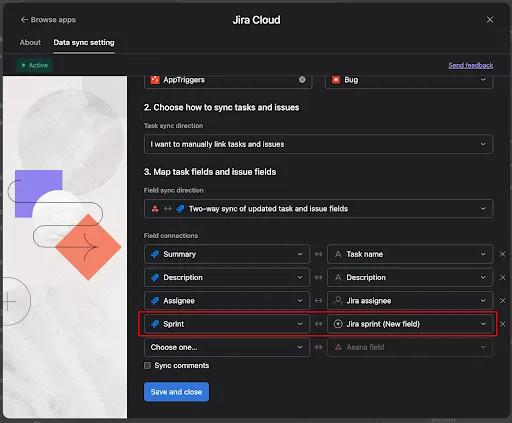
Sprint field for field mapping
Report by sprint using the sprint field in Jira. The sprint field is a single-select custom field in Asana.
Use cases examples
- Filter tasks in your Asana project by sprint
- Aggregate story points by sprint with project dashboard
Using sprint sync
- Open any Asana project and click the Customize button.
- Select Apps and then the Jira Cloud App.
- Activate the Jira Cloud App in the project by logging into your Atlassian account.
- If you have already authenticated, the data sync tab may prompt you to reauthenticate if you are missing the sprint read scope.
- On the Jira Cloud App page, open the Data sync settings tab.
- Select a Jira project and issue type.
- Note: The sprint field will not appear if the Jira project does not support sprints. See this Atlassian article for how to create sprints.
- Select the sprint field under Map task fields and issue fields.
- Select a Jira project and issue type.
Important notes
This field should sync just as any other synced single-select field would.
Asana task
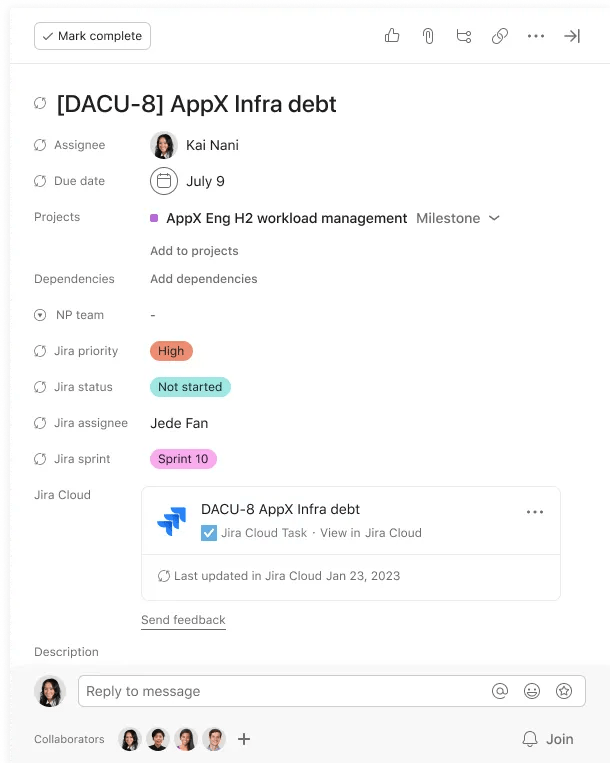
Jira issue
Sync for existing tasks
There are scenarios where tasks are already linked to Jira issues prior to having a data sync setting update the values of this task. For example: tasks may be linked to issues prior to a data sync setting being applied to the project, or tasks may already be created prior to getting linked to an issue in a project where the data sync setting is active. In order to have sync apply to these issues while not overwriting values, we apply sync as follows:
If the one way field sync has been selected
A one way sync is performed for all fields, as the user has specified via the data sync settings that one side is the source of truth.
If the two way field sync has been selected
A one way sync is performed for all Jira app custom fields in Asana but standard fields will not be synced to avoid unexpected data loss.
- The newly created Jira app custom fields should be updated with the latest values from Jira.
- Task name and description should stay unchanged until the user makes changes from Asana or Jira per the field map in the data sync setting.
Using sync for existing tasks
- Create a new Asana project and multihome or create tasks that already have Jira widgets attached (before setting up data sync settings).
- Open the newly created project and click the Customize button.
- Select Apps and then the Jira Cloud App.
- On the Jira Cloud App page, open the Data sync settings tab and create a data sync setting.
- Note: It is not necessary to import issues at this stage if the issues are already linked to existing tasks.
- Check tasks in your project that were already linked to Jira widgets:
- The newly created Jira app custom fields should be updated with the latest values from Jira.
- Task name and description should stay unchanged, until the user changes that from Asana or Jira per the field map in the data sync setting.

Permissions and privacy
Creating a Jira Issue from Asana
When creating a new Jira issue from Asana, the integration follows Jira’s permission model, so a user can only create a Jira issue if they have permission to do so in Jira. This is the only scenario where a user can write data into Jira (to create a new Jira issue). Similarly, this is also the only scenario where the integration reads Asana data.
Viewing and editing data synced from Jira
After Jira data are synced into Asana tasks, they become part of the Asana work graph object. And therefore, the view and edit permissions to these data are subject to the standard permissions of the tasks and projects.
Learn more about task and project permissions with our Help Center articles.
Use synced Jira data for automation and project-level reporting
Custom rules and project-level reporting are available on Asana Starter, Advanced, Enterprise, and Enterprise+ tiers, as well as legacy tiers Business, and Legacy Enterprise.
After the data sync, Jira data becomes part of the Asana work graph as custom fields you can use to create project-level dashboards, create rules, and sort, filter, and search tasks.
FAQ
Please refer to our Jira Cloud FAQ article for more information on Asana for Jira Cloud.
What is available to each tier?
|
Available on Asana Starter, and on legacy tier Premium | Available on Asana Advanced, Enterprise, Enterprise+, and on legacy tiers Business and Legacy Enterprise |
|---|---|
| Jira app actions in rules: Premium customers can use rules that create a Jira issue after a trigger is activated. For example, when a task progress is set, a new issue in Jira is created. | Jira app actions in rules: Use rules that create or update a Jira issue after a trigger is activated. |
| Link an Asana task to an existing Jira issue. | Jira app trigger: Use rules to create or update an Asana task after creating or updating a Jira issue. |
| Two-way data sync: Sync new and existing tasks when they are connected to a Jira issue. The two-way data sync updates task and issue fields when a Jira issue is updated, or an Asana task is updated. | |
| Can create custom rules. | |
| Can use Jira data to create project-level dashboards, sort, filter, and search tasks. |
Related articles
- No related articles found.